Showing posts with label Tutorial. Show all posts

Little Ghost Trick-or-Treat Bag

October 27, 2012


Last year I sewed up this simple trick-or-treat bag for Halloween.  Mr. Carlee and I sketched the ghost together.  Since it was such an easy and cute project, I want to share the pattern.  I intended to post it at the beginning of October, but somehow October has gotten away from me.  Did that happen to you too? 

In any case, I have the pattern all digitized for you now.   I don't have a full picture tutorial, but I promise it's so easy to put together.


You Will Need:
  • Little Ghost Trick-or-Treat Bag Pattern
  • 1/4 yard white fleece or felt
  • scraps of black fleece or felt
  • 14 inches of one inch wide grosgrain ribbon (I doubled up on my ribbon to make it a little stronger, so if you decided to do this, you will need 28 inches of ribbon)
  • thread, scissors and sewing machine.

Step 1: Cut out pattern and tape together on the dotted line.

Step 2: Cut out 4 main body piece from white fleece or felt, two for the front, and two for the back.

Step 3: Cut out the eyes and mouth from black fleece or felt.

Step 4: Sew eyes and face to one of the ghost pieces.

Step 5: Pin the two front pieces together and the two back pieces together.  Edge stitch around each (you will end up with one front piece and one back piece that is two layers thick).

Step 6: Making sure to leave a large opening on the top of the ghost's head, edge stitch around the sides, arms, and bottom of the body.

Step 7: Fold your ribbon in half lenghwise (if you are doubling up on your ribbon) and sew along the edges.  Sew the ribbon on each side of the opening.

Step 8: Take Trick-or-Treating and fill with candy!

The finished bag will be 10.5 inches tall, and 7 inches wide.  Obviously this is a pretty small Trick-or-Treating bag, but I think it's perfect for toddlers, preschoolers, or even for my Kindergartener.  My philosophy is that a smaller bag means that you fill it faster and then you don't have tons of candy to worry about later. 


I actually have a few more Halloween posts that I am trying to put together, so you may hear more from me over the next few days.  But maybe not too, since the weather man is telling me that we are having another crazy pre-Halloween storm this year.


P.S. Do you like our Jack-o-Lanterns this year?  The boys wanted scary ones.  The small pumpkin that is being eaten by the bigger one actually had a face carved too, but I came outside yesterday to find a squirrel had just eaten it's face off.  All those pumpkin shreds on the ground are bits of his face.  Creepy!  Kid 2 was so scared by this that we turned the pumpkin around so he didn't have to see the missing face. 


Simple Scalloped Cloths

November 15, 2011


I love the children's book by Simms Tabak called Joseph Had a Little OvercoatThe moral of the story is that "You can always make something from nothing."  I try to live by that principle, or at least by making do with what I have.  So, when I was given a nice white cotton sheet with a tear in it, I knew that it still had lots of life.  I didn't quite make something from nothing, but it's close enough in my opinion.

Sorry, the tear is not shown, I already starting cutting into the sheet before I thought to take a picture of it.


At my house, we use a lot of cloths to wipe sticky hands and faces.  We were in sore need of a few more.  So, face cloths were the first of many projects that I will undertake with this ripped sheet. 

Now, you can probably tell by the imperfect looking stitches on my cloths that I am a beginner sewer.  This is a project that even the most beginner of sewers can undertake, as face cloths for babies don't really need to look perfect.  Most of you who read this blog don't need a step-by-step on how to make cloths, but if you do, read on.   Click through for the rest of the tutorial.

Wool Diaper Covers (Soakers)

June 21, 2011

 I promised to share with you how I make my wool diaper covers from recycled wool sweaters.  Combined with a prefold cloth diaper and snappi, this is my favourite system for keeping my baby comfortable and still keeping my money in the bank.  


And did I mention it's cute?  My son often goes out in just a t-shirt and his little wool shorts and always looks adorable.

Don't you love the droplet of drool dripping past his belly button?
When I'm out doing my rounds of the thrift stores, I often check out the sweaters.  I look for 100% wool (or cashmere is the real score) sweaters that are soft against my face.  I have a few different projects that I like to make with wool sweaters; including mittens, hats, pants, and diaper covers.  All of these projects require you to felt the wool first.  This means that if I can find a wool sweater that has already been felted (read, shrunken so it is boxy and will no longer fit a human), it will save me some time.

Some sweaters felt better than others, and it's hard to know until after you run them through a hot wash and dry how they are going to work out.  I like to felt my wool just enough so that it thickens up and won't easily fray, but still has a little stretch. This is especially important for making wool soakers (and pants), since you will be pulling them on over top of a diaper.  I have had good success with the H&M brand of wool sweaters (like the heathered grey that I used today).  For whatever reason, these are really soft, and keep their stretch even after felting.


I typically buy my sweaters at the Salvation Army on half-price Wednesday, so I usually only pay about $2 or $3 per sweater.  You can easily make one soaker from one sweater (with the arms leftover for pants), so it's a great bargain.   I use the free pattern (with some modifications that I will share with you) over at Katrina's Quick Sew Soaker Pattern.  The one I like is labeled "newer soaker pattern". This really is a great pattern, and you can't beat free!


Once you have felted your sweater, cut off the bottom band with the ribbed edge.  This is going to form the waist band of your soaker, and you will want this piece to be about 3.5" wide for a large or medium (if you are making small or extra small I would still recommend 2.5-3" wide).  I stick with the pattern recommendation for the length of the strip.   

Next, cut out the rest of your main pattern pieces (front, back, extra wet layer - which didn't make it into the picture).  If your wool feels kind of thin, instead of cutting out the extra wet layer, do two sets of front and back pieces.  This will make sure your cover is thick enough to keep all the moisture inside where it belongs.
For the leg bands I chose to use a contrasting wool (and again on the waist band) just for looks, and I would also recommend cutting this much wider than the pattern suggests.  The pattern calls for a rectangle measuring 9.5"x2.5" for a medium, but I recommend adding about an inch to the width on all the sizes.  Another important note, remember to cut your leg band pieces so that the stretch of the knit wool goes from side to side, and not up and down.  The same goes for your other pattern pieces.  You want to be able to get this on your wiggly baby, and if you cut the pieces the wrong direction, it will be trickier. 


At this point, I follow the pattern instructions pretty faithfully.  Sew together the front and back piece at the crotch, and then to the inside sew on the extra layer.  Since we are sewing a knit here, be sure and use a stretch friendly stitch.  If you have a serger, you can use it for all the sewing except for attaching the extra layer.  For this step, use a zig-zag stitch.  Next, sew up the sides.  I don't have a serger, so I like to use the overlook stitch for stretch fabrics on my regular sewing machine.  If you don't have one, use a zig-zag.  It might not be quite as pretty, but remember this is just going on your kid's bum.

Last, you need to attach the leg and waist bands.  For the leg bands, sew the short sides together, and then fold it in half hiding the seam on the inside.  Depending on how stretchy your wool is, you might need to trim a little bit of length off of your piece.  Err on the side of making leg openings that are too roomy, since this is a much better problem than making them too small (speaking from experience).  If you're not sure, try the band on your baby's thighs before you sew them to the soaker.

For the waist band, I sewed up the side, but then I don't fold it in half.  Since we are using the already finished bottom edge of the sweater, we aren't worried about fraying.  The other reason I like to do this, and why I like the waist band to be quite tall, is that this makes the top edge of the soaker less bulky under clothing.  And if you have boys, like I do, you want to be sure and keep the top edge of your diaper completely covered with the wool.  I have purchased covers in the past that have a trim fit in the front, and I have had problems with leaks at the top. Unless you are diapering an infant with an umbililcal cord stump, I think it's best to steer clear of low cut diapers, and especially covers.


Here is the finished cover.  I bought the size tags here for 10 cents a piece, but I have seen them in several other places as well.  You could also make some simple handmade tags with a letter stamp, some permanent ink, and a piece of ribbon or twill tape.  I have a decent collection of handmade diaper items, and I find it essential to know what size each item is.  Labeling is a must for me.


If you haven't sewn much with knits and you are feeling nervous about having perfectly smooth seams, don't be afraid.  Mine always come out a bit wavy when I use my overlocking stitch despite all my best efforts.  The good news is you can't tell from the outside.  This is not the case from the inside, as you can see.


And any imperfections will be tricky to spot once you get your cute little model into them.


After you are finished, all you need to do is lanolize your cover and it will be naturally waterproof.

Have any of you had any experience making diaper covers for your kids?  Or do you just think I'm  a crazy person for even suggesting it?  I know I told you already how much I love using cloth, but it really is awesome.  Especially when I'm making the covers for only a few dollars (and an hour or so of my time) and they are really fabulous.  Happy cloth diapering everyone!

Soft Rattle Tutorial

April 2, 2011

I am in the stage of giving baby gifts to many of my friends for their second or third baby.  I wouldn't consider sewing my strongest skill, but I still like to make something handmade for those little babies.  My go-to gift for any new baby is a baby toy.  Today I'm going to share with you a simple, easy and quick soft rattle toy that anyone can make (regardless of their sewing skills).


This is a soft taggy rattle that includes all of the elements that babies love:  a jingly noise, lots of colors and patterns, and lots of ribbon to chew on.  It also appeals to parents: it's handmade, you can never have too many small toys, and it's soft, so little babies won't bonk themselves in the face like they always do with plastic baby rattles.

This rattle is super simple to make, but to make it every easier for you, I've created a pattern that you can print and use.  Find it here

This toy will take you good sewers 15 minutes, maybe.  Those of us with less sewing skills may have to allot half an hour, tops.  Okay, set your timer, and let's get started.

Wet Bag Tutorial

April 1, 2011


When it comes to giving baby gifts, I have made a ton of different things to give away: bibs, leather shoes, clothes, car seat covers, soother (pacifier) straps, and the list goes on and on.  I really love sewing for babies!

Lately, I have tried to focus my sewing attention, and make just one type of gift for new mums and babies.  Something fast, useful, and not too expensive to make.  My project: wet bags.  What is a wet bag, you ask?  It's a small zippered pouch with a waterproof liner that you can store in your diaper bag, car, or beach bag.  My version is the perfect size for just a few wet things, and has a handle for easy carrying.

Now, I use cloth diapers with my baby, so obviously I need a wet bag for on-the-go diaper changes.  If you are giving a gift to a mother using cloth, then this is the perfect gift.  And if not, then this is still the perfect gift.   Having a small waterproof bag to store wet, dirty clothing in is awesome.  It's also useful for wet swimming suits after a day at the pool or beach.  The finished size of this bag is also just right for a small case of wipes, a changing mat, a few diapers, and rash ointment, so it can double as a diaper clutch. 


Like I said, a wet bag makes the perfect gift, for someone else or for yourself.  Now that I've convinced you how awesome it is to have a wet bag, are you ready to make one?  It's easy, I promise.

*Update: a kind reader pointed out my error in listing the necessary yardage.  I originally listed 1/8 yard for both the PUL and outer fabric, but you really need 1/4 yard of each.  Sorry for the mistake!  The tutorial has been updated accordingly.  

Suede Elbow Patches

March 11, 2011

I had something else on deck for sewing this week, but then my son tore a little hole in the elbow of his green and white striped sweater.   Mending is a great way to save money, and give new life to things that would otherwise end up in the garbage. 
 

My son is three, and he is hard on clothes.  Usually things are stained and ripped by the time he grows out of them. This time, his sweater got a hole in the elbow, but it was still in great shape in all other ways.  My baby has the cutest striped green and blue sweater with elbow patches, and I thought it would be cute to patch this sweater so that they matched.  As a side note, I am a shameless coordinator of my kid's (and sometimes the adult's) clothing, and I plan to keep doing it as long as possible.  Who could possibly resist a little boy in a striped sweater with suede elbow patches?  What about two little boys?  It would be impossible - I love the mini-professor look!

This is such a fast project, and it would be great even with a perfectly whole sweater.  From start to finish, I spent about 30 minutes doing these two patches, and I love the result.  This is my favourite kind of project - fast, easy, and it looks great. 

As you already know, I have a ton of leather sitting around for projects like these, so I dove right in.  Don't be intimidated by leather, it's really not as hard to work with as you may think.  If you need ideas about where to find leather and tips on sewing with it, read more about it here.  Or if you aren't ready to make the plunge, try using another fabric.  Corduroy would look dashing as well, but keep in mind that you will need to finish the edges to keep your patches from fraying.  In addition, you may need to bulk up woven fabrics a little bit with some fusible interfacing.  
Suede Elbow Patches Tutorial


Tablecloth Diaper Changing Mat Tutorial

February 18, 2011


I recently brought home a pretty spectacular vinyl table cloth for $1.  I bought it with the intention of making a changing mat, but I almost loved it too much to cut.  I tried to think if I was ever going to use it as a table cloth.  The answer was no, so I decided to stick with my original plan.  Now that I have finished this project, I'm glad I took the plunge and used this fabric.   I have a tendency to hoard fabric, but I'm trying to be bold and just use the things that I love.  You would think it would be easier with thrifted or re-purposed fabric since I usually buy it for almost nothing, but sometimes it's harder cutting into something when I know I might never find fabric like it again.

One of my two boys is still in diapers, and I feel like he always needs to be changed at the most inconvenient moments.  Often he needs a clean diaper when we are somewhere without a handy changing table.  The changing mat that used to live in my purse was really cute, but only big enough for a newborn baby, or to go under a bigger baby's bottom.  When I'm changing my son in the dirty bathroom at Salvation Army, I need something big enough to cover his bottom and his head.  I'm not as worried about their bathroom as I am about my kid laying on that dirty floor!

As I've been thinking about making a new changing mat, my main criteria was to find a fabric that wouldn't crack after being folded, but was still wipeable.  I have tried using clear vinyl from the fabric store, both the kind that you iron onto fabric, and the type that you just layer on top, and it always cracks.  When I saw this tablecloth I knew I found the perfect fabric.  It had been folded for years in its original packaging, and there were no signs of cracking!

Diaper Changing Mat Tutorial
Folded Size: 5 1/4" x 7 1/4" (similar to a size 3 diaper)
Open Size: 20.75" x  14.75"
To make your own awesome changing mat, you will need:

  • 1/2 yard of wipeable fabric (thrifted table cloth, oil cloth, or something similar)  
  • Your choice of fastener.  I have a snap press, so I use snaps whenever I can, but you could use the type of snaps that you hammer in (found in the notions section of the fabric store) or 1" square of velcro
  • Thread 
  • Straight pins
  • Painter's tape (masking tape)
  • Sewing machine and needle
  • Optional: Small scrap of coordinating fabric
Step 1 - Cut out your main pieces

Cut out two pieces that each measure 15.5" x 21.5".  Round the corners by tracing around a cd, bowl, or whatever you have handy.  Cut along your drawn lines.


Step 2 - Make the Tab

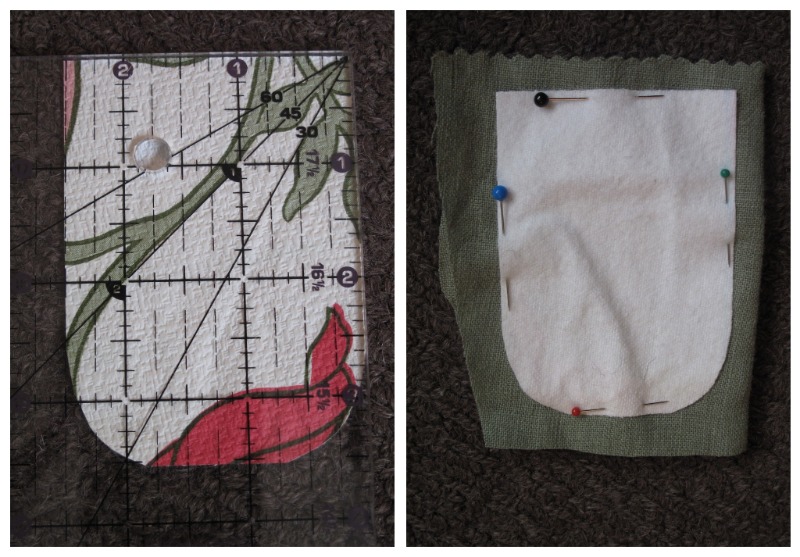
Cut out your tab.  Cut out one piece that each measure 2.5"x 3" from your main fabric.  You also want to round the corners on one side only (like in the picture).  As you can see, I cut out one piece floral table cloth, and then placed it right side down on top of a small scrap of green linen.  I often do this when I am sewing together two small pieces.  This way I don't have to be too concerned about getting them to line up precisely.  I sew first, and then trim them after to make them the same size.  This saves me a lot of frustration!

Pin your two pieces of fabric together inside of your seam allowance(I used my presser foot since that is the easiest, and that works out to a little more than 1/4").  Pins will leave holes in this type of fabric that don't go away, so be careful to pin only very close to the edge.

Sew your tab, using the edge of your presser foot as a guide.  After you are finished sewing your two pieces together, trim off the extra fabric using scissors or pinking shears.

Turn the tab inside out, and edge stitch all the way around.


Set your snap stud or sew on the hook side of your velcro to the rounded end of your tab.  The stud or the velcro should be sewn to the side of your tab with the coordinating fabric if you are using two different fabrics like I did.

Step 3 - Attaching your Fastener to the Mat

I designed this changing mat to fold into thirds, and then into thirds again.  To figure out where your snap socket or velcro loop tape needs to go, fold one of your two 21.5"x15.5" pieces in half and measure in 5" from one edge.  Mark this spot with a water soluble marker.

Now that you have marked the spot where you need to place your fastener, either sew your velcro, or place your snap socket over your mark.  If you are using snaps I would recommend sewing a small square of fabric (finished size: 1.5"x1") onto your vinyl first.  This will keep the snaps from pulling through your fabric.  
Sew the square over your mark.  My three year old is very helpful as you can see!
Now put in your snap socket in the center of your square.

Step 4 - Assemble Your Mat

Take the piece of fabric that does not have either a snap or velcro, and fold it in half the same way you did before.  Make a mark at the halfway point.  With the right sides of your fabric facing inwards, carefully pin all the way around your fabric.  Again, you want to be careful not to make any holes in your fabric.   You will need to leave a space to turn the mat inside out, so leave a gap around your mark like shown in the picture below.  I like to mark the start and finish point with two pins so I remember to stop sewing.
 
Starting and ending with your double pins, sew around the perimeter, using your presser foot as your guide.  Remember to back stitch when you start and finish sewing.

Step 5 - Sewing on the Tab

Turn your mat so that the right sides are facing out.   Fold your mat into thirds so that you have a long skinny rectangle and the hole that you used to turn your fabric right side out if at the top.  It should be near the snap (or velcro) we sewed on earlier.  Grab your tab and snap it onto the mat.  Now adjust how far it comes out of the gap, until things line up nicely.

Hold together carefully (or use a paperclip) because you don't want to make holes.  Sew your gap closed by edge stitching around the entire mat.


Step 6 - Mark Your Folding Lines

To help you remember how to fold things up, the next step is to sew two lines on top of the mat.  To do this, fold your mat in thirds like shown below.  Mark your stitch lines with painters tape.

Sew along the edge of the tape, remembering to back stitch when you start and stop sewing.


Step 7 - Finishing Touches

All that you have left to do is to pull off the painters tape and trim your threads.  Fold up your mat and it's ready to be used.


Congratulations, you are finished.  Now sit back and admire your new changing mat!  Now if only it was for something more fun than changing diapers...

Related Posts Plugin for WordPress, Blogger...