Showing posts with label Baby. Show all posts

Brown Top for KCWC

November 17, 2012

I realize this is at least two months late, but I really did a tiny bit of sewing for KCWC this fall.  The day before we arranged to do our annual cheapskate family photos, I decided to whip something up for Baby Girl.  A few weeks earlier I hemmed a dress for a short friend, and kept the scraps from the brown gored skirt.  The fabric was nice and I thought it would be perfect for a quick skirt or top for the little one since the bottom edge was already hemmed. 


I ended up making a little swing top (could be a short dress with some bloomers for the summer).  It was not quick, mind you, but you know how these things go.  I always wildly underestimate the amount of time it will take me to sew anything.   

I made the pattern by tracing a jumper in her size, and drafting the puffed sleeves based on the arm cycle and guessed at how puffy I wanted them to be.  My first round with the sleeves wasn't puffy enough so I added another piece under the arms.  As usual, I started this at night after all the kids were asleep.  This has many advantages, but this time I was sad I couldn't try in on her earlier on.  Somehow it came out a little too tight across the chest.  I had to do some tricky maneuvering with the back, but eventually I got it to fit sometime the next morning (not too long before we left to take pictures). 


So yeah, not quick.  But cute, right?  I really love the vintage cream button in the back, and the crochet lace trim (also vintage) on the front. 


I really love this lace.  I think it's so sweet.  In addition, I inherited it from my grandmother (Mary Frances of course) when she passed away, and that makes me love using it even more.  It's such a good feeling using bits of trim or fabric that she collected and saved over the years.  I wonder what she had in mind when she bought this particular lace?  I think she would be please to see it on her great granddaughter.      

Mass Production Feels Good

October 15, 2012


Over the last few weeks I've been really cutting into my leather stash.  Since I made my first pair of baby shoes five years ago, I've collected a sizable leather collection.  Most of it has come from thrifted coats, skirts, pants, etc, but I've also bought scraps and even a whole piece from a tannery in Salt Lake when we used to live there.

After making all those leather masks last month, I thought I would just keep going with the mass production of leather items.  I have made a few pairs of these little leather moccasins for gifts and for my own baby girl, but each time I've had to make some adjustments to my pattern.  I decided to just make a few more pairs to work out the kinks.  And then once my pattern went together properly, I just decided to stockpile a few pairs while I was at it.

 
The result was 9 pairs of shoes in a week.  Now I just need to get a few of those wrapped up and mailed off to some babies!  Oh, and clean out my sewing machine.  Sewing with leather, and suede in particular, is very dirty.   


Even though it can be a little bit tedious to make the same thing over and over, there is something very satisfying about making a pile of shoes.  And making a few pairs at a time make the whole process much faster.  It's also a bit of a relief to have a few baby gifts ready to go in case I don't have time to make or find something for a baby shower.  I seem to go to a lot of baby showers these days, so I don't think my little pile of shoes will last long at all.

Oh, and in case you are wondering if I'm ever going to make or show you anything other than leather masks or baby shoes ever again, I actually made a little top for Baby Girl that I just need to take a picture of.  I love how it came out and I'm excited to show it off.

Black Baby Mocs

September 24, 2012


I just went to a baby shower for a friend who is having a girl.  She also has a two-year old boy, so I was expecting the shower to be filled with pink, pink, and more pink, with possibly a little purple thrown in for good measure.  No surprise, I was right.  Just a few hours before the party, when I finally got around to making a gift, I decided to put together a little pair of black baby mocs (shamelessly copied from these brilliant ones like I've done before).


With all the girly things I knew she was going to receive, I thought it would be nice to bring something a little more gender neutral that will go with everything.  Oh, and they look hip and adorable.  The baby mocs that I made for my little one get tons of compliments every time she wears them - which I must admit is good for my ego.  They really are so cute on.        


Baby shoes are pretty fast for me to make at this point, but I only make them if I'm in the mood.  I'm fickle like that.  What do you bring to baby showers?  Do you make or buy?  Is there a standard present you bring, or do something different each time?   

Blue Bonnet

September 19, 2012

I have admired the Peekaboo Bonnet pattern at Made by Rae for a while now, and last week I finally took the plunge and bought the pattern.  We spent a few days camping with my brother's family and my parents in Lake Placid, NY, and instead of packing, or getting ready for our trip, I spent the night before making this hat.  She didn't have a hat that fit, so what else was I supposed to do?   You would have all done the same, right?

As I'm sure you all have heard, it's a really great pattern.  It's fast, easy, reversible, doesn't use a ton of fabric, and very cute.  I'm a sucker for a baby in a bonnet, as you might remember, and Baby Girl is adorable in her new bonnet. 

For this bonnet, I used some blue cotton chambray, white bias piping and tape, and pink and white striped cotton from a thrifted men's button-up shirt.  The scrap of pink and white fabric that I had left was an odd shape, so I had to piece together several pieces so make the brim.  It's always a good feeling to use scraps!  It makes me feel better about all the fabric scraps I compulsively save. 

Easter Bonnet

April 3, 2012


This is my first Easter with a little girl of my own to sew for.  Last year I sewed dresses for Emily's girls, and I'm afraid to say it, but I didn't make a thing for them this year.  Sorry girls!  And sorry to my boys too for that matter.  Last year I made them adorable matching bow ties.

I am not sure that I'm going to find the time to make my own little girl a dress this year.  But, I did make her at least one adorable thing to wear to church on Easter Sunday. 


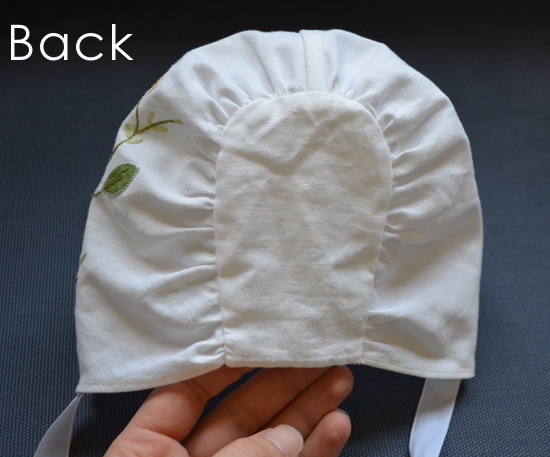
I'm a sucker for the traditional look for babies, and I love bonnets.  I picked up a small embroidered and hand appliqued linen at the Goodwill a few months back with the idea of making an Easter bonnet for my baby girl.  It sat in my pile until yesterday, when I finally decided to give it a try.  I started off with this pattern, but had to change quite a few things to make it work.  I was a little limited with the shape of my brim because I wanted to use the pretty bottom edges from the linen.  And then I had my usual problem with commercial patterns never fitting the way they should.  After the first time I sewed it up, the bonnet was roomy on my two year old, and it was supposed to be for an infant.  Eventually I took it in enough times to make it fit.  Honestly, it's not completely perfect, but I'm working really hard at not letting the perfect be the enemy of the good.

The linen was sort of small, so I had to cut it in half and sew the pieces together the other way to make the embroidered edge wide enough to form a brim.  I used a french seam to keep it tidy, and hand tacked the seam down in the front.   This means that the pretty hand appliqued pattern is only on one side, but I think it looks kind of sweet that way.


I had just enough fabric to cut two pieces for the back so that I could hide all the seams.  I used the finished sides of the linen for the bottom edge, so that I didn't have to hem that later.  To construct the bonnet, I gathered the brim piece to fit the back and sewed it to one of my two pieces.  When I got the sizes worked out, I sewed the second piece on so that the brim was sandwiched in the middle.  After that I flipped the bonnet right side out and hand stitched the opening (along the back bottom edge) shut.   


The last thing to do was to add ribbon ties to each side.  


Oh, and put a cute baby inside.  That's really the last step.  The bonnet really is pretty adorable on, and who would ever notice the imperfections when you have a sweet baby to admire?


The Cradle is Finally Finished!

March 20, 2012

Remember this?

 
Well, I am finally ready to share my finished cradle.


Okay, the cradle has actually been done for awhile, but I haven't posted about it for a few reasons.  First, my room has been a mess and I haven't had the chance to clean and then take pictures of the cradle next to my bed.  Oh, and the baby has hardly slept in it since she prefers to be held.  All the time.  The light has also been pretty bad since winter in New England is cloudy.


But luckily, Spring is here (and baby girl is starting to figure out how to stay asleep without me holding her)!  Anyone else excited?  About Spring I mean, although I don't mind you sharing my excitement that I can occasionally put my baby down.


Honestly, there isn't a great transformation since it started white and ended white.  But it's a clean lead-free white, so I'm pretty excited about it.  I really love to use white in our house, partially because we have always lived in really small spaces, and white helps things not look too heavy and crowded.


And the mattress is new.  I bought  a piece of 1" foam from Joann's (with a coupon because foam is really expensive), and cut it to fit the bottom.  I also sewed up a zippered waterproof mattress cover and a few sheets for it.


I actually felt rather clever when I made the sheets because they are sure to stay on with their  boxed corners, and two pieces of elastic across the back.   

So there you go.  A clean white cradle for the new baby girl.  


We Are Surviving

January 27, 2012

Baby girl is now over a month old, and she isn't so sleepy anymore.  Her new favourite thing is to be held all day long - even, and especially, when she is sleeping.  Yesterday was a tough day for us.  The only time she slept the whole day was in my arms.  Each time after I got her to sleep and would place her every so carefully in her cradle (I still need to take and share pictures of it).  Then I had about 1-2 minutes before she would wake back up again.  As soon as she was awake she was fussy because she was so exhausted.  Last night was the most and the loudest that she has cried.


Mr. Carlee is borrowing a lens from a friend to try out, and this picture came out pretty crazy as a result of his experimentation.  But I think it does a good job of capturing the moment.   


Notice the red eyes?  I'm feeling pretty tired and it's hard to feel like I can 'catch up'.  I sure feel tired, and I have had several people comment that I am looking tired.  And they are right. 

But honestly, even though the last month has been a little tricky, we are doing okay.  One thing that is great about having a third baby is that I know this stage won't last forever.  Eventually she will start sleeping better and for longer periods of time.  Babies get big so fast, and I feel like it's so much easier for me to enjoy this stage this time around, despite the almost total lack of sleep.  Instead of feeling sorry for myself for how hard this is, I'm trying to keep it in perspective and log a lot of time wearing baby girl in a carrier (I'm loving the Moby Wrap courtesy of Alexis).   

Over the last few days I've seen a ton of people reference an article on Carpe Diem from Glennon Melton at the Huffington Post.  I know I don't 'enjoy' every moment with my kids, but I like to think that I am enjoying the journey.  Being a mother (and a parent) is pretty hard.  As my friend Eva said recently, "it's a full-body job".  That's so true, right?  My back hurts from carrying the baby, and my body feel a little worn out, but I'm also pretty full of love when I look at my three little ones.

 
I'm no expert on this whole three kids business, but I feel like it's all going to work out.  We've had tons of help from kind friends that have brought meals and watched the boys while I spend some time with the baby, and sometimes even have a much needed nap.  And there are lots of things that aren't getting done.  My house isn't very clean (as I mentioned before), and I haven't pulled things together enough to start using cloth diapers with the baby, but we are surviving.  Right now, I'm totally alright with survival. 

Making Stuff

January 12, 2012


This little baby of mine is almost 4 weeks old, and I'm slowly starting to get back into the normal swing of things.  She isn't a champion night time sleeper, but since this is my third, I know the night waking won't last forever.  And she has actually been better at night than the two year old.  He has the croup, and sleep apnea, and a habit of waking at night, so we have been pretty tired around here.  Needless to say, I haven't been making much of anything lately.  Unless you count lots of milk, dirty dishes, the occasional meal, and piles of both dirty and clean laundry.


I did have a burst of energy the other day and I made a few quick pairs of little leggings out of old shirts.  One of the thrift stores I frequent is having a deal where you can have 5 free items of clothing per week for the month of January.  You don't even have to buy anything else.  I picked up a couple of items to actually wear, but mostly I've come home with clothing meant to repurpose.  Making baby leggings is super easy, especially if you use the bottom hem of a shirt for your pant legs.  I traced a pair of tiny newborn sized leggings for my pattern, and put two pairs together pretty fast.  The construction is simple.  Sew the side seams of both legs.  Then sew the crotch seam.  Make a casing for your elastic and thread it through (or sew the elastic directly to the top) and you are finished.  Knit doesn't fray, so you don't have to stress about finishing, but I like to use the stretch overcast stitch on my machine to keep things tidy on the side seams.  And I use a double needle on the waist band for looks and for stretch.  Easy.  And that is frankly about all I can manage these days.

Welcome Baby

December 20, 2011

I am so excited to let you all know about Carlee's great news.


Her baby girl was born on Saturday, December 17th, 2011.  Carlee will be spending a lot of time getting to know her little one, and teaching her how to sleep at night and stay awake in the day.  (That's hard figure out when you're only a few days old.)


We will be seeing a bit less of Carlee over the next few weeks.  Until then, I thought that I might remind you all of about some of the great projects we've posted for babies in the past (since we're in baby mode here).


I hope that you can be inspired to whip up a Christmas present for the baby in your life. 

And of course, congratulations to Carlee on one of her best creations ever!


Baby Countdown

December 2, 2011

Are you all sick of hearing about how pregnant I am yet?  Me too.  I realize that being pregnant is kind of a binary thing - either you are or you aren't, but I think at this point (38 weeks) I should be considered very pregnant.  I'm still feeling well (for the most part that is), but I think I'm almost to the point where I'm ready to have this baby.  Not yet, since the cradle is still being painted, but I am nearly finished making space for the baby clothes and sorting and washing them.

Is it bad for me to admit that as much as I love little babies, and especially my own babies, I'm a little apprehensive about this whole thing.  I worry that I'm not going to be able to juggle three kids, especially since breastfeeding is basically a full time job for the first while, and taking care of my two kids already takes up almost all my time.  And then there is the sleepless nights that I know are about to come my way.  Not to mention the actual birth part.


All that aside, I'm really excited to meet this little girl.  I'm excited to see how different, and similar, she will be to my two boys, and smell that new baby smell.  Today at the thrift store I found these adorable moccasins for $1, and I got so excited at the thought of having a sweet little girl to wear them. 


Wrapping Paper Covered Canvas

November 21, 2011


When my daughter was born last year, I was given some very nice gifts.  Some of those gifts were wrapped so beautifully with cute, cute wrapping paper.  I think gift wrapping is almost a lost art, and I admire those who take the time to wrap presents.  (I'm usually the gift bag sort.)  I hated to throw out that beautiful wrapping paper, so instead used it as an inexpensive room decoration.

I bought a three-pack of cheapy canvas boards from the dollar store.  Next, I cut the wrapping paper out in a rectangle shape that was slightly smaller than the canvas.  Finally, I glued it on with white glue, covering the entire front and back of the wrapping paper.  When it was dry, I attached it to the wall in my daughter's room.    Ta-da!  A cheap, easy, and sentimental room decoration.


New Buttons

November 14, 2011

Over the last few months, I have inherited quite a few second hand baby clothes for the girl that we are expecting next month.  I love free stuff, but I'm also kind of picky about what I like my kids to wear.  I know, beggars can't be choosers, but I still want them to look nice.  Lots of the baby clothes were really cute, others were things that wouldn't choose to put my baby girl in, and some were good basic shapes but had details that I didn't like.  I've taken on lots of small projects working on items from the last category, doing things like taking off collars, unpicking embroidery (with mixed success), taking off ribbon, or changing buttons.


This pair of pants is a good example of how a little change can really improve the way something looks.  I forgot to take a picture before I got started last night (and the lighting would have been horrible anyways), so here you can see the difference between the finished side (left) and the original (on the right).  These pants are a nice chambray, but the flap front kept gaping open and they seemed to be missing a little something.  I hand stitched the front to the sides, and added six buttons to the front.


Now they look like cute little sailor pants.  Much better.  And all it took was a few minutes, a needle and thread, and a few buttons from my collection.

Related Posts Plugin for WordPress, Blogger...