Showing posts with label Easter. Show all posts

Bunny Buns

April 5, 2012

In just a few hours, my family is headed out of town for the long weekend.  (Yay for long weekends!  And yay for actually living within driving distance of family for the first time in ten years!)


I wanted to write a quick post to wish you all a happy Easter, and to share a bit more of what we've been up to this week.  I had grand plans of making matching Easter dresses for my girls.  Since Carlee finally has her own girl to sew for this Easter, I thought I should take on the project for my own kids myself.  I cut out the fabric for one of the dresses, and that's about as far as I got.  Oh well, they'll be finished someday, or not. 

One thing that I did actually get around to completing this week was to make a batch of Bunny Buns.  Bunny Buns are simply dinner rolls or buns, shaped like bunnies.  My four year old had so much fun rolling out the dough, making shapes and adding eyes and other features.


I used my favourite dinner roll recipe, and when it came time to shape them, we made bunny shapes instead.  We added raisins and cloves for eyes, nose, ears, etc, and then baked them as normal.


They are best straight out of the oven with a bit of honey butter.  Yum! 

The Easter Bunny already visited our house this morning, bringing a few small candies and some dollar store trinkets.  We plan to do more egg dying this weekend, and visit some baby chicks and bunnies as well.


Easter Bonnet

April 3, 2012


This is my first Easter with a little girl of my own to sew for.  Last year I sewed dresses for Emily's girls, and I'm afraid to say it, but I didn't make a thing for them this year.  Sorry girls!  And sorry to my boys too for that matter.  Last year I made them adorable matching bow ties.

I am not sure that I'm going to find the time to make my own little girl a dress this year.  But, I did make her at least one adorable thing to wear to church on Easter Sunday. 


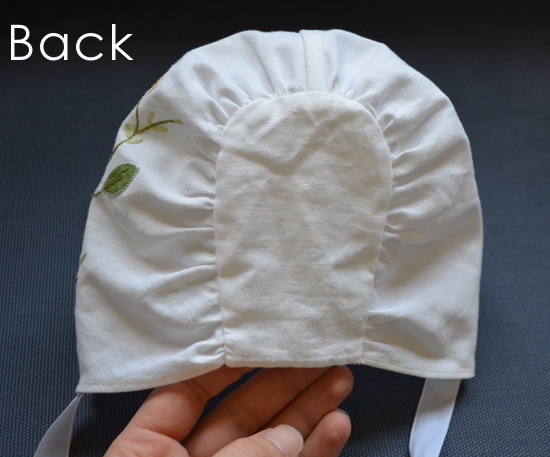
I'm a sucker for the traditional look for babies, and I love bonnets.  I picked up a small embroidered and hand appliqued linen at the Goodwill a few months back with the idea of making an Easter bonnet for my baby girl.  It sat in my pile until yesterday, when I finally decided to give it a try.  I started off with this pattern, but had to change quite a few things to make it work.  I was a little limited with the shape of my brim because I wanted to use the pretty bottom edges from the linen.  And then I had my usual problem with commercial patterns never fitting the way they should.  After the first time I sewed it up, the bonnet was roomy on my two year old, and it was supposed to be for an infant.  Eventually I took it in enough times to make it fit.  Honestly, it's not completely perfect, but I'm working really hard at not letting the perfect be the enemy of the good.

The linen was sort of small, so I had to cut it in half and sew the pieces together the other way to make the embroidered edge wide enough to form a brim.  I used a french seam to keep it tidy, and hand tacked the seam down in the front.   This means that the pretty hand appliqued pattern is only on one side, but I think it looks kind of sweet that way.


I had just enough fabric to cut two pieces for the back so that I could hide all the seams.  I used the finished sides of the linen for the bottom edge, so that I didn't have to hem that later.  To construct the bonnet, I gathered the brim piece to fit the back and sewed it to one of my two pieces.  When I got the sizes worked out, I sewed the second piece on so that the brim was sandwiched in the middle.  After that I flipped the bonnet right side out and hand stitched the opening (along the back bottom edge) shut.   


The last thing to do was to add ribbon ties to each side.  


Oh, and put a cute baby inside.  That's really the last step.  The bonnet really is pretty adorable on, and who would ever notice the imperfections when you have a sweet baby to admire?


An Easter Bunny for Baby Girl

March 29, 2012


Sorry that I've been absent so much from this space.  Kid 2 got his tonsils out at the beginning of the month, and that was all kinds of fun.  Last week, with the official start to spring, I thought he was finally well and back to normal.  We had a unusually warm week, and even made it to the beach... in swimsuits!  Lots of the flowering trees started blooming, and the magnolias were especially beautiful.

Alas, this week has been a bit dreary.  The weather has cooled off, and the temperatures got so low one night that the magnolia blossoms froze and turned brown.  In other dreary news, Kid 2 spent 6 nights in the hospital with RSV.  He has kind of a complicated medical history, and I won't go into the details here, but the short story is that his heart condition makes it harder for him to get enough oxygen when he has a respiratory infection.  I'm pretty sure Kid 1 also had RSV, but for him it played out as just an occasional cough.  And there it is, this has been a dreary week.  My husband stayed with our son at the hospital and I was at home with our other two kids, and only stopped in for a visit or two each day (while my kind, kind friends watched my other kids).

Yesterday, while I was at the hospital, and my husband was giving at presentation at lunch workshop, my friend Jessica came over and played with my kids.  Not only did she take excellent care of them, but she washed the mountain of dishes that I was building in my kitchen.  Awesome, right?  Since my afternoon plans consisted mostly of washing dishes and holding my baby, when she fell asleep in her bouncer, I suddenly found myself with a bit of time.  Perfect for sewing an Easter Bunnny for Baby Girl (my boys each got bunnies on their first Easter, so I am continuing on with the tradition).

I used my Jack Rabbit Softie Pattern that you can download for free here.  I don't know if I should admit this, but I haven't made one since I sewed up the original 4 years ago.  It was fun to revisit this pattern, and mix things up a bit in the process.    

I used an old striped super soft cashmere-blend sweater, and kept things simple by not adding the face, hands, or tummy pieces.  I used white leather for both the tail and 'M', and a yellow gingham for the inside if the ears.


I love how the rabbit looks and feels, but be warned it's a little more fiddly to sew with a stretchy sweater.  A felted sweater would work similar to using fleece.  Mine wasn't, so I interfaced all the pieces but the ears to add some structure.  This made the sewing easier, and I think will help it hold up a little better in general.


Here are all the pieces before I stuffed them put them all together.  Even the 'guts' for this rabbit looked adorable (and I was pleased with my self for how well all the stripes worked out).


When I got to stuffing the main body, I ran out of stuffing.  Of course.  I haven't had a chance to run over to Joanns to pick some more up, so the rabbit isn't as plump as I'd like.  A couple more handfuls of polyfill and a little hand stitching to close up the opening, and she will be ready for Easter!


I also opted to not use buttons for eyes (a little safer for something intended for a baby), and stitched a simple 'sleepy' face.  Cute, right?

Anyone else sewing bunnies for Easter?  The Long Thread has a great list of bunny tutorials and patterns, and my Jack Rabbit Softie is on that list.  If you make one, I always love seeing the end result (it makes my day to get an email with pictures of something someone has made using my patterns and tutorials).  There are lots of blogs (with pictures) linked up in the comments section for my pattern, so please click on those to see what everyone else has made. 

The Beginnings of Spring

March 24, 2012

Hey, hey!  It's officially Spring!  This should mean that I'm sewing cute Easter dresses for my girls and making Easter decorations and treats and kid crafts.... right?  Well, if you live at my house, Spring so far has looked like snow, and being wiped out on the couch sick. 

We are just now on the upswing, and I'm beginning to feel that Spring will bring life.  All of this extra light in the evening, and just the promise of warmer weather to come is enough to brighten my spirits. 


Today we dyed Easter eggs using natural food dyes.  The idea is that you take colourful foods, simmer with a bit of water, remove the food, and then you are left with a natural dye.  A basic recipe is 1 cup of food to 1 cup water, simmered for 30 minutes.  You can either add a bit of vinegar to your dye or dip each egg in vinegar before dyeing it.  In addition to the dye, we used rubber bands and wax crayons for decorating.  I used the following colours:
  • Ground Turmeric - Yellow
  • Blueberries - Dark Purple
  • Beets - Pink
  • Red Onion Skins - Red
  • Yellow Onion Skins - Orange
  • Purple Cabbage - Blue
The colours are not quite as vivid as commercial dyes, but it was a fun experiment, and I also felt quite safe letting kids eat the hard boiled eggs after decorating them. 


My daughter and I also had fun changing our Valentine's heart tree to a spring leaf tree.  I originally had pulled a few branches off of a tree in my yard, stuck them in a mason jar, and covered them with little paper hearts.  I wasn't ready for the branches to be tossed, so I changed the coloured beads on the bottom to greens and yellows, and exchanged the hearts for paper leaves.

Now that I am finished with this being sick business, I'll have to put my mind to more Easter projects.

Related Posts Plugin for WordPress, Blogger...