Celebrating Valentine's Day

February 7, 2013

I think that Valentine's Day is a pretty fun holiday - especially if you've got a house full of little girls (which I do).  Let's see... hearts, pink and red, sparkles, chocolate... yep that's right up our alley.

Here's what we've done to celebrate Valentine's Day so far:

Heart Themed Crafts

We've been doing lots of colouring of hearts - tracing them, painting them and colouring them in.


Decorating

I pulled out my Valentine's decorations from last year, and still like them.  I posted a picture of the felt heart wreath last year here, and the heart garland is made from felt heart shapes and ribbon.  The picture is of the Calgary Temple, taken by my lovely friend Laura.  And those snowy branches are from my sister's wedding reception last year.


Making Valentine's
 
 
My oldest is a planner.  Before February even hit, she was eager to start making Valentine's cards for her classmates.  I convinced her to make some to mail first, so we could wait for the list that the teacher sends home.  (There are a lot of names in her Kindergarten classroom with many spelling options).  I printed off these Cute As A Button cards.  My two year old had fun gluing on buttons, and my five year old, got much more creative.  For her classmates, M picked out these cards, and is drawing a picture on the back of each.  


Valentine's Party
 
 
As a reward for awesome behaviour, my five year old, earned a Valentine's party.  She got to invite four friends.  Oh, this party was the most talked about thing in our house for weeks!  On the menu we had mini heart shaped pizzas, strawberries, watermelon, veggies, and chocolate cupcakes.  We played some games, did a craft, and even had a wishing well, with a prize for each guest.  I gave M $5 to spend at the dollarstore and she had so fun fun picking out what she needed, and planning all of the activities.  The day of the party, my two year old was recovering from being sick, and things got a little crazy, so the camera only came out one time.  I can assure you the party was a good success, despite the lack of documentation.


I still have a few more Valentine's activities planned: heart shaped pancakes are a must, and we will also make a great Valentine for Daddy. 
 
How are you celebrating Valentine's Day?


Wooly Winter Hats

January 28, 2013


A couple of months ago I pulled out the bin full of mittens, hats, and scarfs to see what would fit my kids this winter.  It turns out that both the boys have the same size head, so they needed new hats to keep warm this winter.  There are actually lots of free patterns and tutorials for kids winter hats, and I have to say the collective wisdom of the internet is awesome.  I used this free pattern from Martha Stewart that I've sewn up a few times before.  The hats are made of felted sweaters (I actually like my sweaters to still be a little stretchy, so I don't felt them quite as much as some) and lined with soft cotton velour.   

Now that they boys are old enough to have strong opinions about what they wear, I let them make most of the decisions about what their hats would look like.  Kid 2 picked out this dark blue knit and requested a light blue dinosaur.  Easy.  Kid 1 is going through a phase where he LOVES red, and his original idea was to have red and green stripes all throughout.  I couldn't find a sweater like that at my thrift store, and I didn't want to sew stripes together, so I settled for this.  He also drew this robot for me to add to the outside.  I had to make a few modifications, but it's pretty much exactly his design.  As much as it can be tricky to fill their requests, I like that they are getting more involved with the making process. 
 

The third hat was actually a gift for a friend.  He is the kind of kid that is always taking things apart, his favourite toy is his circuit board, and I wanted to make something that reflected his personality.  It occurred to me that an 'idea' or 'light bulb' hat would be perfect.  I felt like a genius for this.  Maybe I should make myself an 'idea' hat too!       

Wool Tote Bag

January 25, 2013


This may be my last late Christmas present post, and I wanted to get this sewn and posted before the end of January.  While January is excusable, February is getting ridiculous.

This tote bag is for my sister-in-law.  She mentioned needing a tote style bag for church, and this is what I ended up making.  Mr. Carlee helped me choose the fabric from my stash (since it was for his sister after all).  The grey wool suiting was bought years ago at Savers (thrift store).  I've had good luck buying wool suiting at this particular thrift store.  The black and white corduroy hounds-tooth was another inherited piece from my friend who recently moved to South Carolina.  She said that it was left-over from a pair of pants she made in the 70's.  Wow.  I would have loved to see those pants.  I find the print kind of dizzying as the inside of the bag, and I can only imagine women's pants made out of it.  


The finished bag is 15" tall and 14" wide (with 20.5" long straps).  It's big enough for a binder, and a few books, but not so big that you feel like you are toting around a suitcase. 


I wanted to keep things simple, but still make it special.  I added a little D-ring on a black patent leather strip to the inside (for keys).  I think the yellow piping keeps things from being too serious. 


Mr. Carlee suggested adding the leather monogram to the front.  We both agree that the letters ended up a little bigger than what might be ideal, but we didn't realize this out until the entire bag was finished.  Next time.

Over the last five years that I've sewn with leather, I've learned that when you are sewing two layers together, it's best to cut out the second layer AFTER you sew them together.  This is particularly true if one of more of your pieces is stretchy.  Leather is always a little stretchy, but some is crazy, like the yellow, for instance. 


The finished bag is 15" tall and 14" wide (with 20.5" long straps).  It's big enough for a binder, and a few books, but not so big that you feel like you are toting around a suitcase. 


As an aside, if you are interested in making bags, and want to learn more about how they are contructed, Ikat Bag is doing an awesome series right now.  I have made lots of bags over the years, and I've learned quite a few new things after reading her posts so far. 

Christmas Mittens (Take III)

You may remember how I tried to make some leather mitts for Mr. Carlee for his birthday last year.  That was actually take two on that particular pair, and this year I was bold enough to go for a third try.  Not by Christmas, mind you, but in the second week of January.  No worries though, January is still plenty cold in New England, perfect for wearing mittens.


After last year's attempt and failure, I cut a big hole where the thumb should go, and drafted a new thumb piece.  I have come to love using paper towel for this type of job.  It drapes similarly to leather (or fabric), and it's cheap and readily available.  Sometimes when I'm making a pattern for shoes/slippers, I'll use paper towel and staple it together to give myself a sense of how it will sew up. 


I wouldn't say that these mittens are a perfect fit nor the sleekest of mittens.  But they do stay on, don't squish his thumb, and I think I'm calling it good.  I don't think I can really fix the problems without starting completely over again, and after making several pairs of mocs from the same leather, I am pretty much out.


Thankfully Mr. Carlee values me for more than my leather mitten making skills, and he has worn them in spite of their imperfections.  This has two possible explanations; first because he loves me and is a good man, and second, his other leather gloves went missing this year - complete coincidence I promise. 

January Christmas Sewing

January 17, 2013

Hello again friends.  I trust all of you had a very happy holiday and are well on your way to a lovely new year as well.  Now that our Christmas tree has finally come down, I'm really buckling down to getting some present finished for Christmas.  I wish I could say they were for 2013, but I am not that kind of lady.  2012 it is.  Better late than never, right?

In our family we exchange gifts with one set of cousins, and this year my kids 'gave' to Emily's girls.  The boys had minimal involvement other than affirming that matching pink skirts sounded like a good present.  Emily's girls approved the fabric choices and I like them too.  The pink striped fabric is actually a really nice linen that I inherited from a friend that recently moved to Charleston, SC.  She passed on a big box of really nice linen, wool, and courdoroy, and I have some projects in mind for a few of the other pieces.  


I actually intended on just making two skirts, but the first smaller sized skirt ended up much too short for Emily's Kid 2.  No problem, I'll just keep it for my Baby Girl.  Now if they ever see each other they can all be matching.  Photoshop might be our only hope of making that picture a reality.


I didn't use a specific pattern or tutorial for the skirts, but the bottom was finished using some home made bias tape and the technique from the Lazy Day Skirt by Oliver + S.  Although it takes a little longer, I like making skirts with a flat front and an elastic in the back.  And enclosing all the edges of course!  I'm a little obsessed with the finishing details, and this helps me sleep better at night.

Next up is a tree skirt for our brother (although it's really for his wife).  We spent Christmas with them in Ottawa (Canada) and they didn't have one.  I had this really nice green wool (also from the box of fabric treasure) and we looked at lots of different tree skirts to figure out what she might like.  In the end she decided that she wanted something simple and classy, and thought I would know what she would like.  I hope I'm right.


I bound the edges with a bottom weight linen blend from Joann's and made the tree appliques out of the same fabric.


Initially I tried two more complicated techniques using interfacing (first this, and then I tried cutting out the shape from interfacing and ironing down the seam allowance all around the edges).  They both looked puckered and took forever.  Mr. Carlee mentioned that his mum always used a zig-zag stitch around things, and in the end that was the right thing to do. 

I have plans for at least two more gifts, and then realistically I should probably get started for next year! 

Good Morning Muesli

January 10, 2013

It is snowing buckets here.  This morning I wanted nothing more than to cuddle back up in my duvet and go to sleep until the snow melts.  Of course, that wasn't exactly an option. 

At least I had a yummy breakfast waiting for me.  Mr. Emily had just made a big batch of muesli, and it did make my morning a little bit better.  We don't eat muesli very often, but the Mr. had just gone to a whole foods store, saw the price of the muesli, and thought "I could make that at home for cheaper."  So he did.  And now I have a renewed love of the Swiss breakfast food.  Be warned: this is not a meal that you can eat quickly.  There is a lot of chewing involved.  Or as Dr. Seuss would probably say, "If you like to chew, this breakfast is for you!"


Want to make your own?  Here's the recipe:

Good Morning Muesli

 4 cups rolled or flaked grains (we used a mix of oats, rye, barley and triticale)
1/2 cup chopped walnuts
1/2 cup chopped almonds
1 cup raisins
1/2 cup chopped dates
1/4 cup chopped apricots
1/2 cup sunflower seeds
1/4 cup flax seeds

1. Mix together and store in an airtight container.
2. Serve cold topped with milk or yogurt and fresh fruit.


Hearts to Newtown

December 17, 2012

Friends, I'm just popping in for a minute today.  I have a few sewing and cooking projects I've been meaning to post about, but this is more important.  Like most of you, my heart has been breaking for the families in Newtown.  Hopefully unlike most of you, I have family in Newtown.  Mr. Carlee's oldest sister lives there with her husband and 5 kids.  Thankfully their three elementary aged children attend the other school, but several of their friends lost children on Friday.  I'm not eloquent enough to express how I feel about this terrible tragedy, but I wanted to share one small way that you can send a little bit of your love to this small New England town.  My sister-in-law's friend is working on a project for her town called Hearts to Newtown.
The idea is simple: spreading love, goodwill and cheer through the heart of a child. We are calling for elementary-aged children's art on paper hearts of all sizes, to be plastered all over Newtown, CT. Include child's first name, age and state. With these hearts, we hope to spread a tangible expression of the love felt by so many people, all sharing in grief for those suffering. Send your paper hearts to:

P.O. Box 754
Bethel, CT
06801


My boys and I will be sending our hearts to Newtown along with our thoughts and prayers.  

Making Christmas Presents

December 8, 2012

This year, mostly in an attempt to save money, but also in an effort to limit commercialism, I decided that the gifts I gave my kids would be homemade.  I also limited myself to only using the supplies I had on hand.  No buying expensive fabric! 

Luckily, my kids are only 2 and 5, so their expectations for Christmas gifts are pretty low.  Santa will still be bringing non-homemade presents, or at least the kind he makes in his workshop (ahem Amazon.com).  I just finished the presents today, and thought that I'd share.

For my two year old, I made little placemats for the play kitchen.  She is always getting my fabric napkins, laying them out, and setting out an elaborate meal, so I thought that her own set of placemats were in order.


I cut up an existing piece of pre-quilted fabric intended to be bound into a baby quilt.  It had sweet little "blocks" just the right size for mini-placemats.  The fabric is a stiff polyester, I think salvaged from my mother-in-law's stash.  It was too stiff and scratchy to be used for wrapping a baby in, but perfect for making little placemats.  After cutting rectangles, I bound the edges in bias tape (my first attempt at machine sewn binding), and called it good.  I think my daughter is going to love these.


For my five year old, I made an apron.  I had made her one when she was two using this awesome pattern, but it is a bit small for her.  Besides, the little sister needs to wear an apron too.  Since I last made the apron, the pattern has been updated to give a size for 5 - 8 year olds.  Perfect!  I used pink fabric from my eternal source (see here and here), and embellished with some retro Strawberry Shortcake pieces.  I think this fabric originally came from our Grandmother, Mary Frances, but it came to me via Carlee.  I am also sure that the new apron will be well-loved too.


What about you?  Are you making anything for Christmas?  What will it be?  Do share!  I am thinking of making one more small thing for each, but haven't decided what yet.  Any suggestions?


Pumpkin Costume

November 20, 2012


I know Halloween has been over for weeks now, but I wanted to show you what I made for the Baby Girl this year (pumpkins are still seasonal, right?).  The boys went as Spiderman and Batman this year.  I made a few cool leather masks for them to wear (based on these here, but with leather of course), sewed a quick cape, and called it a day.  Batman already had a shirt and wore some black pjs for the rest of his costume.  Easy.  Spiderman wore a crazy-tight (one size too small) store-bought polyester suit a friend lent us.  Of course he loves it and wears it everyday.  I'm over it now, but it took me a bit to embrace the tackiness that is still somehow very adorable on a cute three year old boy.

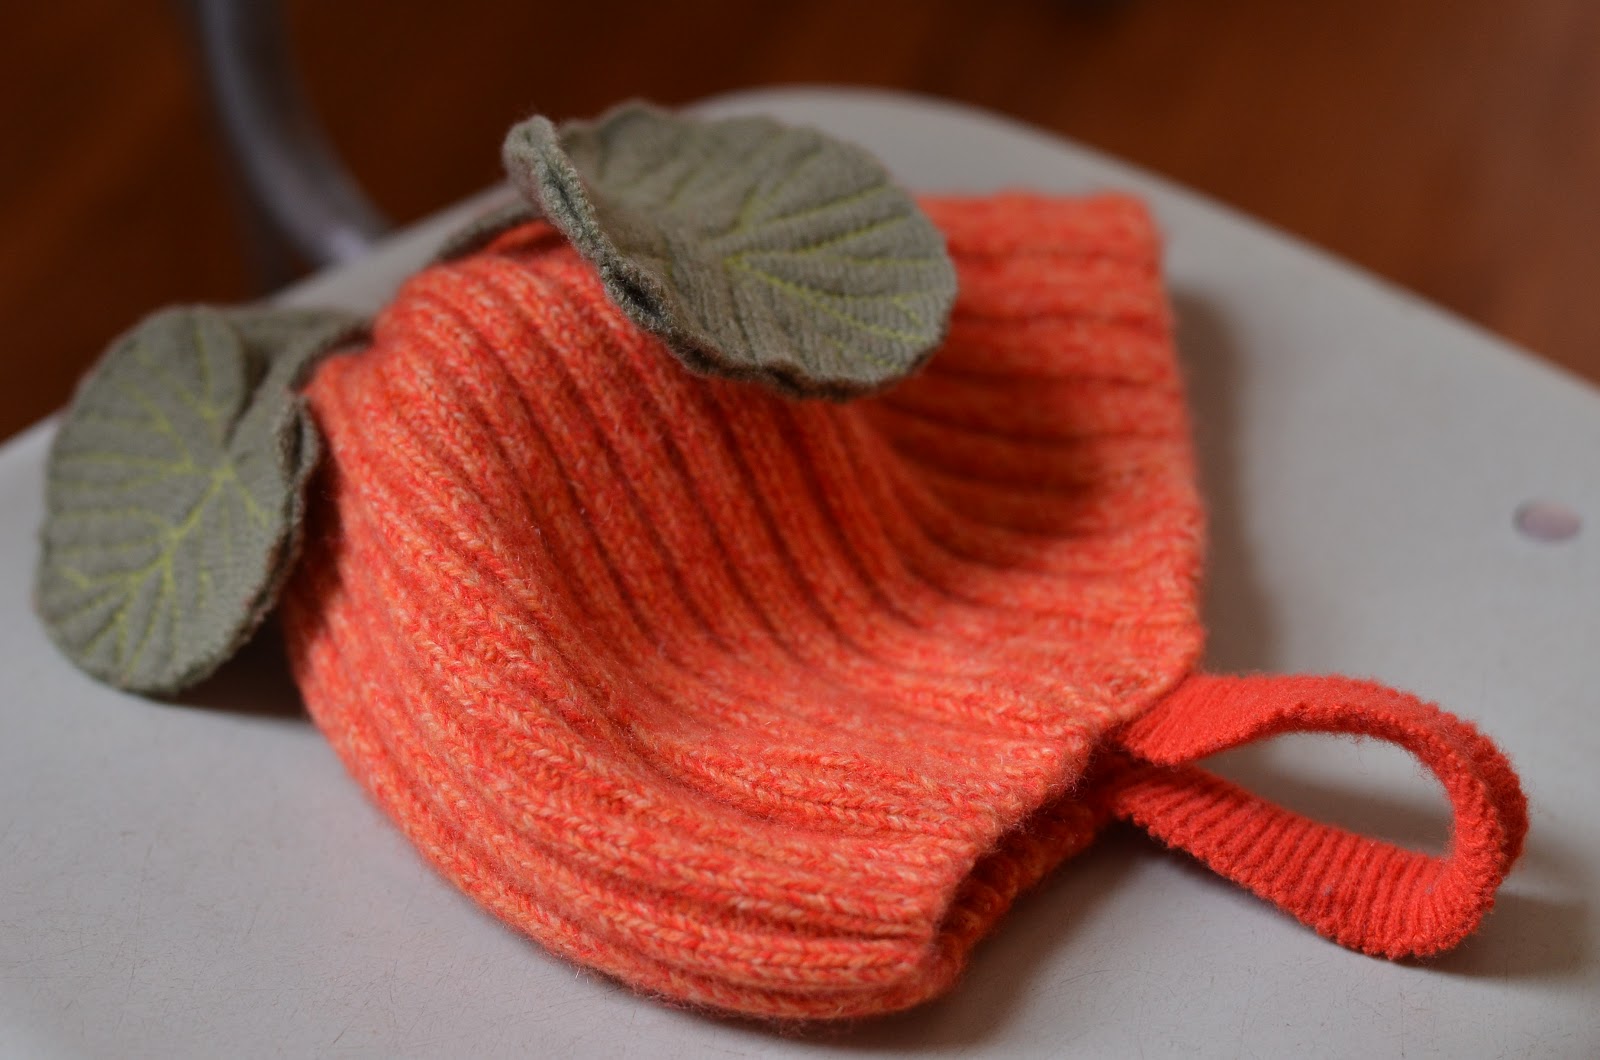
Anyways, back to the baby.  I had an idea for a rainbow (which is funny because I've seen a few pop up online after I started thinking about it), but I didn't have everything I needed at home the night I came up with the idea and wanted to start work on it.  While digging through my fabric, I found the softest orange cashmere turtleneck that politely asked me to be made into a sweet little pumpkin costume for the Baby Girl.  Of course I said yes! 

I decided to go with a pretty straight forward pumpkin hat.  I used the turtleneck portion of the sweater to make the hat.  The stem is a green felted sweater rolled up and sewn into the top.  I made the leaves by sewing two layers of the same green sweater together, stitching it to look like the veins in the leaf.  I kind of love how the leaves turned out.
 
 After I finished adding everything to the top, and sewing a little strap to the bottom edge to keep it from falling off, I wasn't completely happy with the overall shape of the hat.  I decided to sew some elastic thread into the back edge to tighten things up a bit.  To give the front some shape, I folded the bottom edge under until it formed a sort of soft brim and hand stitched it into place.  I like it at first, but I really loved it after I made these two little changes.


Instead of making a puffy pumpkin body, I decided to just sew a simple sweater dress hoping that she will get a bit more use out if it this winter.  It is cashmere after all, so it is warm and cuddly.


This sweater wasn't felted and I was really worried that it would stretch a ton as I worked with it.  To combat this I sewed pretty much all the seams with a piece of scrap copy paper underneath to make sure my feed dogs fed it through properly.  It worked like a charm!


The dress came out exactly as I imagined it.


My favourite little detail is the sweet little vintage orange button.  I was too scared to try and make a button hole, so I sewed the button to the top and added a slide closure to the inside.  

Brown Top for KCWC

November 17, 2012

I realize this is at least two months late, but I really did a tiny bit of sewing for KCWC this fall.  The day before we arranged to do our annual cheapskate family photos, I decided to whip something up for Baby Girl.  A few weeks earlier I hemmed a dress for a short friend, and kept the scraps from the brown gored skirt.  The fabric was nice and I thought it would be perfect for a quick skirt or top for the little one since the bottom edge was already hemmed. 


I ended up making a little swing top (could be a short dress with some bloomers for the summer).  It was not quick, mind you, but you know how these things go.  I always wildly underestimate the amount of time it will take me to sew anything.   

I made the pattern by tracing a jumper in her size, and drafting the puffed sleeves based on the arm cycle and guessed at how puffy I wanted them to be.  My first round with the sleeves wasn't puffy enough so I added another piece under the arms.  As usual, I started this at night after all the kids were asleep.  This has many advantages, but this time I was sad I couldn't try in on her earlier on.  Somehow it came out a little too tight across the chest.  I had to do some tricky maneuvering with the back, but eventually I got it to fit sometime the next morning (not too long before we left to take pictures). 


So yeah, not quick.  But cute, right?  I really love the vintage cream button in the back, and the crochet lace trim (also vintage) on the front. 


I really love this lace.  I think it's so sweet.  In addition, I inherited it from my grandmother (Mary Frances of course) when she passed away, and that makes me love using it even more.  It's such a good feeling using bits of trim or fabric that she collected and saved over the years.  I wonder what she had in mind when she bought this particular lace?  I think she would be please to see it on her great granddaughter.      

Rag Rug, or It's Okay to Give Up

November 8, 2012

I started working on this rag rug back at the beginning of September.  I had a lot of pink fabric, and thought that a cute little rag rug would be the perfect thing for my girls' room. 


It started out as an easy project.  I cut three, three inch strips - I think I had nine feet of fabric.  I did that again, sewed the two strips together, and had three really long fabric strips.  These I braided together; it was pretty easy up until this point.  From here, I was supposed to hand stitch the rug together.  It turned out to be trickier than I imagined.  The fabric was too thick!  I was breaking thread, bending the needle, breaking the needle, and really hurting my fingers.  Eventually, I gave up and put the project away.  A few days later, I had a revelation:  I could hot glue the rest of the rug together!  When faced with the idea of never finishing the project, or just doing a half-job, I thought that I should at least finish it!


Okay, if you look really close, you can see a bit of hot glue bursting out.

And here we are!  A hot glued rag rug.  At least it is finished.  It looks cute, and it is a fun place for my girls to sit in their bedroom.  Will it hold up?  Who knows?  But at least it isn't sitting in the corner of my sewing room, barely completed, and never to be looked at again.  I gave up, and it's okay.

Little Ghost Trick-or-Treat Bag

October 27, 2012


Last year I sewed up this simple trick-or-treat bag for Halloween.  Mr. Carlee and I sketched the ghost together.  Since it was such an easy and cute project, I want to share the pattern.  I intended to post it at the beginning of October, but somehow October has gotten away from me.  Did that happen to you too? 

In any case, I have the pattern all digitized for you now.   I don't have a full picture tutorial, but I promise it's so easy to put together.


You Will Need:
  • Little Ghost Trick-or-Treat Bag Pattern
  • 1/4 yard white fleece or felt
  • scraps of black fleece or felt
  • 14 inches of one inch wide grosgrain ribbon (I doubled up on my ribbon to make it a little stronger, so if you decided to do this, you will need 28 inches of ribbon)
  • thread, scissors and sewing machine.

Step 1: Cut out pattern and tape together on the dotted line.

Step 2: Cut out 4 main body piece from white fleece or felt, two for the front, and two for the back.

Step 3: Cut out the eyes and mouth from black fleece or felt.

Step 4: Sew eyes and face to one of the ghost pieces.

Step 5: Pin the two front pieces together and the two back pieces together.  Edge stitch around each (you will end up with one front piece and one back piece that is two layers thick).

Step 6: Making sure to leave a large opening on the top of the ghost's head, edge stitch around the sides, arms, and bottom of the body.

Step 7: Fold your ribbon in half lenghwise (if you are doubling up on your ribbon) and sew along the edges.  Sew the ribbon on each side of the opening.

Step 8: Take Trick-or-Treating and fill with candy!

The finished bag will be 10.5 inches tall, and 7 inches wide.  Obviously this is a pretty small Trick-or-Treating bag, but I think it's perfect for toddlers, preschoolers, or even for my Kindergartener.  My philosophy is that a smaller bag means that you fill it faster and then you don't have tons of candy to worry about later. 


I actually have a few more Halloween posts that I am trying to put together, so you may hear more from me over the next few days.  But maybe not too, since the weather man is telling me that we are having another crazy pre-Halloween storm this year.


P.S. Do you like our Jack-o-Lanterns this year?  The boys wanted scary ones.  The small pumpkin that is being eaten by the bigger one actually had a face carved too, but I came outside yesterday to find a squirrel had just eaten it's face off.  All those pumpkin shreds on the ground are bits of his face.  Creepy!  Kid 2 was so scared by this that we turned the pumpkin around so he didn't have to see the missing face. 


Related Posts Plugin for WordPress, Blogger...