Toddler Mittens

November 29, 2011


I'm getting close to the end of my pregnancy, and I haven't been feeling so motivated to work on my sewing projects lately.  Instead I've spent a few evenings with my knitting.  You already saw how I redid a little red hat, but in our winter gear was also one lonely mitten that was just the right size for Kid 2 and had a matching hat.  I knit this set years ago, and sometime along the way one of the mittens went missing.  I am not a very experienced knitter, but I can knit simple things, and mittens fall into this category for me.  Knitting mittens for small people is a nice project because it doesn't use up a lot of yarn or time.  Both are pluses for me.


This is a pattern I made up as I went along, so I am happy to share it with you.  Please let me know about any problems so that I can fix them.  As I said, I am not an experencienced knitter, and there is probably a better way to knit mittens, but this is what I did and they turned out rather well.

Click "read more" for the full pattern. 


Advent Bags

November 24, 2011

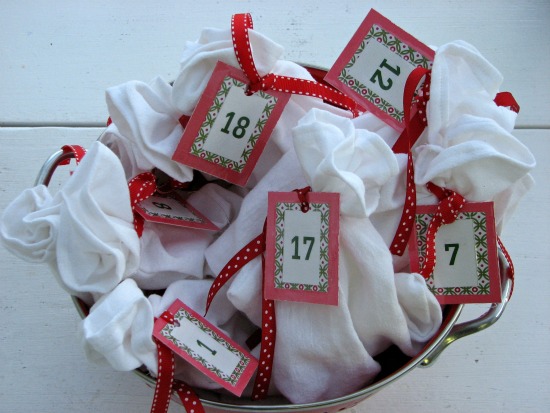
Something that has been on my to-do-list for a few years has been to make a permanent advent calendar.  This year, I finally buckled down and made one.  I am pretty happy with the result.  Although it isn't in use yet, I wanted to share because there is still time for you to make your own. 


I started with this inspiration from House and Home.  The idea is to take 24 little bags that you can fill with your own ornaments and open one for each day leading up to Christmas.  Since I have an abundance of white cotton, I knew it would be the perfect project for me.  I also love the flexibility of it.  My little bags can be strung across a mantle, piled into a basket or under the tree.  I filled mine with a mix of ornaments, candy, and dollar store treasures.  This could change each year to treasure hunt clues, puzzle pieces, stories, lists of activities or purely candy.  I can also pull off the number tags and use the bags for other seasons or activities.

This year, I decided on a mix of ornaments, candy, and little gifts.
Construction was simple for these bags.  I used white cotton and decorative ribbon.  For each bag, I used a 12 by 19 inch rectangle.  This rectangle was folded in half, sewn on two sides, and then the edges were finished.  Each bag measures 9 by 11 inches.  For a tie, I sewed a 12 inch length of ribbon to the seam.  For tags, I printed numbers, glued them to scrapbooking paper, "laminated" with packing tape, and hole punched the top.


I'm pretty excited to hang these bags up, and watch my little ones be excited about opening them and counting down to Christmas.  We plan to put up the Christmas tree next weekend. 

My ornaments are just waiting to be hung on the tree.

Happy Thankgiving to my American friends.  Check back in the upcoming days and weeks for more Christmas ideas.

Knit Hat Redo

November 22, 2011

When my first son was born four years ago, I knit him this little red toque (knitted hat for my American friends) to wear for his first winter. 


It hardly got worn because it didn't fit that well on top, but mostly because it never stayed down over his ears.  I feel like a hat that fails to cover your ears is pretty useless.  So it has sat in the bin with our winter gear ever since.  This year when I pulled out the bin, I decided I should do something about this hat.  After all, it's nice red wool, and I knew I could fix it.  And since my new goal is to 'get stuff done', I made myself work on it last week.  I'm glad I finally got around to it (keep in mind it took 4 years), so now I can use it with my new baby this winter.


This really was a really easy fix.  If you know how to knit (even just a little), you can make these kinds of updates to existing hats that need ear flaps.  I picked up some stitches on each side of the hat, and decreased my stitches (to make a triangle shape) by knitting two together at the end of every other row.  When I got to the bottom (5 stitches left), I just cast off.  I finished it off by adding a tassel to each flap.


When I finished the flaps, I noticed a small hole in near the top, and since the top didn't fit that well anyways, I decided to just redo that part as well.  So I took off the pompom and pulled out the stitches until I got the spot on the hat where I wanted it to started getting tighter.  I followed this pattern for closing up the top.


As you can see, my tension wasn't exactly the same as when I knit this hat originally, but I decided that I didn't care enough to do it again.  Sometimes done is more important than perfect.  I think this is especially true when you are nine months pregnant.


Wrapping Paper Covered Canvas

November 21, 2011


When my daughter was born last year, I was given some very nice gifts.  Some of those gifts were wrapped so beautifully with cute, cute wrapping paper.  I think gift wrapping is almost a lost art, and I admire those who take the time to wrap presents.  (I'm usually the gift bag sort.)  I hated to throw out that beautiful wrapping paper, so instead used it as an inexpensive room decoration.

I bought a three-pack of cheapy canvas boards from the dollar store.  Next, I cut the wrapping paper out in a rectangle shape that was slightly smaller than the canvas.  Finally, I glued it on with white glue, covering the entire front and back of the wrapping paper.  When it was dry, I attached it to the wall in my daughter's room.    Ta-da!  A cheap, easy, and sentimental room decoration.


Easy Pesto Pasta

November 18, 2011


When this meal was first served to me, I immediately thought: "Wow!  Delicious!"  Then I when I realized how easy it was to make, I thought "Oh!  Why don't I ever make this dish?"  Well, now I do.  All the time.  And if you don't make it now, you should, because you'll love it.

The beauty of the Pesto Pasta is 1) It seems a whole lot fancier than pasta with tomato sauce, 2) It is flexible in terms of what you actually put in it, and 3) It's perfect for those who don't like "red sauce," like my 4-year-old.  Oh yeah, and did I mention that it was easy?  I think I may have.

Easy Pesto Pasta

4 cups cooked pasta noodles (rotini and penne are my favourites)
pesto, to taste (I usually use about 3 tablespoons)
3/4 cup feta cheese
1 cup protein (eg. chunks of chicken, chickpeas, fried tofu)
2 cups sauteed veggies (I like peppers and zucchini)
1/2 cup sun dried tomatoes

1. Cook the noodles according to package directions.
2. While noodles are cooking, saute veggies, and cook protein if needed.  Cut up cheese and tomatoes.
3. Toss everything together with pesto. 

Ta-da!  Your easy dinner is served.


Simple Scalloped Cloths

November 15, 2011


I love the children's book by Simms Tabak called Joseph Had a Little OvercoatThe moral of the story is that "You can always make something from nothing."  I try to live by that principle, or at least by making do with what I have.  So, when I was given a nice white cotton sheet with a tear in it, I knew that it still had lots of life.  I didn't quite make something from nothing, but it's close enough in my opinion.

Sorry, the tear is not shown, I already starting cutting into the sheet before I thought to take a picture of it.


At my house, we use a lot of cloths to wipe sticky hands and faces.  We were in sore need of a few more.  So, face cloths were the first of many projects that I will undertake with this ripped sheet. 

Now, you can probably tell by the imperfect looking stitches on my cloths that I am a beginner sewer.  This is a project that even the most beginner of sewers can undertake, as face cloths for babies don't really need to look perfect.  Most of you who read this blog don't need a step-by-step on how to make cloths, but if you do, read on.   Click through for the rest of the tutorial.

New Buttons

November 14, 2011

Over the last few months, I have inherited quite a few second hand baby clothes for the girl that we are expecting next month.  I love free stuff, but I'm also kind of picky about what I like my kids to wear.  I know, beggars can't be choosers, but I still want them to look nice.  Lots of the baby clothes were really cute, others were things that wouldn't choose to put my baby girl in, and some were good basic shapes but had details that I didn't like.  I've taken on lots of small projects working on items from the last category, doing things like taking off collars, unpicking embroidery (with mixed success), taking off ribbon, or changing buttons.


This pair of pants is a good example of how a little change can really improve the way something looks.  I forgot to take a picture before I got started last night (and the lighting would have been horrible anyways), so here you can see the difference between the finished side (left) and the original (on the right).  These pants are a nice chambray, but the flap front kept gaping open and they seemed to be missing a little something.  I hand stitched the front to the sides, and added six buttons to the front.


Now they look like cute little sailor pants.  Much better.  And all it took was a few minutes, a needle and thread, and a few buttons from my collection.

Tiny and Handmade

November 12, 2011


Last month I attended a baby shower for a friend who is having her 5th baby, but her very first girl.  I had picked up a little white knit sweater from the Goodwill over the summer, but I promised her that I was also making something 'tiny and handmade' for her little girl.  Her due date was a week ago, so I decided to finally get down in my basement and sew something.

Usually when I feel like sewing, I don't have a specific vision in mind of what I want to make.  I'll often start by looking through my piles of fabric to see if anything jumps out at me.  And if I'm sewing for someone else, I try and think if any of my fabric reminds me of the person I'm giving the gift to.   I don't have a cute sewing room or anything, but I do have a lot of fabric.  Most of it came from the thrift store (sometimes as sheets, but mostly as yardage that was donated), but there are also a couple big bags of clothing that is waiting for a new life.  I do buy fabric from regular stores sometimes, but since it's usually a lot more expensive than my other sources, I try and limit myself.

I like making this style of dress for baby girls because after it gets too short to be a dress, it can be worn as a shirt or tunic.  It's nice to give things that will last a little longer than 1 month.  The pattern that I used for this dress is Butterick 3846, but I modified it.  I used the front piece for the cross over pinafore, and then cut the back the same except with a higher neckline and less curved armholes.  I also added tabs to the shoulders on the back piece so that they could button in the front.  Instead of completely lining the dress, I lined just the top (bodice) and made a hem facing out of some vintage floral fabric that I thought coordinated nicely.


Here is the 'fabric' that I started with.  Recognize this skirt Emily?  I didn't have a large enough piece to cut out the front and back on the fold, so I added a seam down the middle and topstitched along the seam to add interest, but also to finish the seam nicely on the inside.  Courdoroy frays like crazy, so I am really careful to enclose all my seams when I use it (I used french seams on the sides and for the center seam I pressed it open and turned each side under before topstitching it down). 


The hem facing was stitched at the top edge by hand, because when I tried to do it on my machine it looked horrible.  So I picked it out and sat down with a thread and needle to finish it up.  Mr. Carlee helped me select these buttons from my stash of metal buttons.  I found a whole bunch at the Salvation Army a few months ago (I plan to show them all to you soon), and these were the perfect finishing touch.


I hope my friend loves this little dress as much as I do.  It's certainly nothing fancy, but I love making simple clothing out of high quality fabric and spending time on the details.

I've actually been having a really hard time sewing for this baby that will be coming to my house soon, because I've been feeling the pressure to create perfect and stylish garments that are part of a well planned wardrobe.  It's a little ridiculous, I know, but I think I might make a little jumper similar to this one for her, since I love how this turned out so much. 


Cranberry Pound Cake

November 10, 2011


This year at my extended family's Thanksgiving Dinner, my aunt brought the most delicious cranberry cake.  Lucky for most of you, in Canada, Thanksgiving is celebrated at the beginning of October.  This means that you can still make this divine cake for your Thanksgiving dinner.  Or any old day, because it is so good.

Cranberry Pound Cake                
6 Tbsp. butter
2 cups sugar
2 cups evaporated milk
4 cups flour
6 tsp. bk. powder
2 tsp. salt
4 cups whole cranberries
1. Cream together the butter and sugar. 
2. Mix the dry ingredients together and add to the wet, alternately with the milk.  Your batter will be thick.
3. Add the cranberries and pour into a greased angel food cake pan.
4. Bake 1 1/2 hours at 350 F.
5. To serve, drizzle sauce over cake slices.
Sauce
1 cup butter
1 cup sugar
¾ cups heavy cream
1 tsp. vanilla
few drops red food colouring
1. Mix all ingredients in a heavy saucepan.
2. Bring to a boil, and simmer for 10 minutes.
3. Remove from heat and add vanilla and a few drops red food coloring.

Enjoy!

A Few Things that are Awesome (and One that is Not)

November 9, 2011

I don't lead a very glamorous or exciting life, but this week I've been noticing a few little things that are pretty great.  First, on Saturday night, Mr. Carlee and I spent our evening watching Annie (the original from 1982).  And it was his choice.  And he knows all the words for every song.  He has 6 sisters, so what can I say.   In case you don't think this is very manly, he also knew how many times the dancers flash their underpants in each number.  Does that help? 


Next up on my list of awesome stuff, I can still paint my own toenails.  I'm five weeks away from my due date and it's good that I can still bend.  Now, can I actually see my toes?  Not most of the time, but at least I know that they look respectable even if I can't verify it.  I'm one of those lucky ladies that feels pretty great being pregnant, and I can never compete in the pregnancy complaint competitions.  This baby girl is a squirmy, wiggly thing, and I'm enjoy this time quite a bit actually.

And just in case you think I lead a charmed life, because I'm not sure it gets much better than watching Annie and painting my own toe nails, I tried to potty train my 2 year old, and it was an epic fail.  I have these dreams of only having one kid in diapers, and I decided that my window for making it happen was quickly closing.  We started yesterday (using a modified version of "Toilet Training in Less Than a Day"), and he only had accidents and no successes.  Kid 1's comment, "I never saw pee in his potty even once".  Me neither.  By the end of the day he was refusing to sit on the potty and practice going.

I thought it might be better this morning, but I think it got worse.  There is a good chance it had something to do with his 5am wake up time, which is 1.5 hours earlier than his usual early start to the day.  He was still refusing to try to sit on the potty, and was having tantrums about everything else as well.  During one melt down, Kid 1 declared, "this is the worst day".  And it was only 8am.  I'm not sure it had quite qualified as the 'worst day' quite yet, but on the current trajectory, it was going to be.  So I decided there was no shame in quitting.  After all, he just turned two and I can always try again when baby girl is a few months old.

So what did I do?  I put his diaper back on, threw him in his crib, and hoped he would nap.  He didn't, but I didn't care.  Then I did what I think my mother would have done, and spent an hour wiping down the baseboards and walls around my table, which were shamefully filthy, while he hung out, and cried, and talked to himself in the boy's room.  It still wasn't a good day, but at least it wasn't the worst ever.


What I've been up to lately...

November 8, 2011

In case you've been dying to know what I've been doing in my 'spare' time, let me assure you it's not exciting.  I am STILL stripping paint off my cradle.  I've given up getting the paint off the flat surfaces and am just planning on sanding those smooth, but that's not an option for the spindles.  Yesterday, after a few hours of work, I think I'm finally done the spindles.  I think they will need a light sanding with some fine sandpaper, but I'm done worry about the paint chunks.

It's lucky that I don't mind mindless fiddly tasks, since this project has taken me FOREVER, and I'm not even done yet!  The other good news is that the weather has been unusually awesome.  Apart from that crazy pre-Halloween snow storm, it's been warm enough (and not raining) to be outside during the afternoons.  I know I'm living on borrowed time (and it could get cold and wet any day now), and I hope to be finished the cradle this week.   


Kid 1 was outside with me yesterday, and after looking at the cradle, he said "look, there's wood in there".  That was encouraging.  Yes, under all those layers of paint, there is in fact wood in there. 


There, see the wood?
 
Are you dying to see the finished product?  Me too.  Any painting tips before I embark on that stage? My plan right now is to use spray paint.  I'm thinking of priming it with Kilz and then doing the whole thing white.  Nothing fancy, but I'm going for classic with this one.

Art and Motherhood

November 7, 2011


I want to share my thoughts on art and motherhood today.  I might be the last person to consider myself an "artist," but art is a big part of my life, and it is especially a big part of my concept of motherhood.  My older daughter and I spend a lot of time together in the "craft room."  (That's what she calls the dining room.)  The times when the baby is sleeping, the house is still, and we sit down together, are times that I really treasure.   

I am constantly learning more about child development, parenthood, and how I make this work for my family.  I will never be in a position to say, "I'm good.  I don't need to learn anything else about raising my children."  I am, however, in a happy place with how art plays into my day to day, and my overall theory on life.  Here are my three over-arching art-life-children themes:

Surround children with beautiful things.


Art is about the process, not the product.


Creative time is together time.

I'd like to think these concepts are pretty self-explanatory.  I'd also like to think my life is a good representation of these ideas.  That's not always the case, but I try to have it be the case. 

Surround children with beautiful things.


Beauty is of course, subjective.  I do think that some things are universally beautiful, like the above picture taken by Mr. Emily in the Canadian Rockies.  We printed it and hung it in the house.  We have other gorgeous landscape shots as well as artwork hanging in the house.  One of my favourites is The Kiss which my daughter calls "Daddy Kissing Mommy."  I think that children can be taught to appreciate art and beauty, and that they should also be taught to discriminate between what is good, and not-so-good quality artwork.

Art is about the process, not the product.


Most of the time, when my four-year-old paints, she ends up covering the whole page in a painty mush.  I'm okay with it, because it doesn't matter what the end product looks like.  It matters that she has had fun - and mashing up the paint is always fun.  I do sometimes times introduce my one year old to art, but these sessions are pretty short.  They usually involve her ripping paper, or putting crayons in her mouth.  Art time should be developmentally appropriate.  I try not to introduce projects that are going to frustrate my kids or be over their heads. 

Creative time is together time.


Although it can be tempting to always set my kids up with some paper and paint and get some work done, I try not to do this very often.  For one, it doesn't work.  My kids need me right next to them.  I also want to show them that art is something that I enjoy too, and that I like being with them.  It is fun to sit down and make something together.  In the photo above, my daughter and I covered a box with paper and decorated it.  Of course, the extreme to the concept of together time is that I could do all of the work, and not let my kids experiment or make mistakes.  I try not to do this either.  We work together.  We both contribute and the end result is mostly fun.

So, what about you?  How does art play into your life concept?  What do you do to introduce children to art and the creative process?


Taco Buns

November 4, 2011


I don't know about you, but lunch is my least favourite meal of the day.  Breakfast is easy - we eat porridge, or on special days, something fun like pancakes, french toast or muffins.  Supper is okay, I try to plan things out in advance, and usually get it made while my baby is napping.  That leaves lunch.  In the mornings, when my husband is rushing out the door, he begs me to help him get lunch ready.  At home, I get pretty tired of sandwiches, and never seem to have left-overs.

Sometimes I get my act together, and make and freeze ready to go lunch items.  Today was one of those days.  One of my favourite things to have on hand is taco buns.  This is just taco meat and cheese cooked inside of a bun (or dinner roll, if you prefer).  It is so tasty.  Truthfully, I think it tastes so good because my mom used to make it, and it reminds me of that.  (Although she also used to make pigs in a blanket, and hot dogs don't ever taste good to me.)

Taco Buns

1 recipe your favorite buns (I used this french bread rolls recipe with good success.  I use 1/3 whole wheat flour.)
1/2 lb. cooked ground beef seasoned with taco seasoning
1 c. grated cheddar cheese

1. Mix the bun dough.  Let rise 1 - 2 hours.
2. Cook and season beef.  Grate cheese.
3. Separate the dough out into 12-18 balls.  Flatten each ball.
4. Put 1 tablespoon meat, and 1 tablespoon cheese on each dough piece.  You don't want very much or your buns will leak.
5. Pinch bottoms closed and place on baking sheets pinched side down.
6. Cook at 400 F for 12-14 min. (or according to your favourite recipe directions).
7. When buns are cooled, separate and freeze in a ziplock bag.

I like to do this in the morning, because then you can eat the fresh buns for lunch.  They are yummy.  If you are a vegetarian (like Carlee), I think you could make these with just cheese, seasoned black beans, or another meat subsitute.

What do you do for lunches?  Any brilliant ideas to share?

New Goal: Get Stuff Done

November 3, 2011

The pile that sits inches from my left arm as I type this at my computer.  I should be ashamed.
I am a procrastinator.  Any of you in that same boat?  I have piles all over my house of things to take care of later.  Paper that needs to be filed, clothes that need to be mended or altered, broken toys that need to be glued back together (or tossed), clean laundry to fold and put away, things to return to friends, and the list goes on.  I am also a bit of a hoarder and feel incapable of dealing with clutter, so this can be a bit of a problem for me.  I find that I waste a ton of time organizing my piles, or thinking about how to tackle them, instead of actually taking care of the problems.

So I have a new goal; Get Stuff Done.  And more specifically (because I really do get quite a bit of 'stuff' done everyday), I am working at taking care of problems when they happen.  Today I feel like I made progress.  When we moved to New England (two years ago) we had to open new bank accounts.  Then our old bank merged with our new bank, and our accounts have been a bit of a mess.  Today I finally went into the bank (with both kids mind you) and got everything sorted out.  I took an hour.  Not my favourite hour, but now I can stop feeling worried about mystery fees on accounts I don't use, or accidentally paying my bills from the wrong one.  Progress, right?

And then I felt so good about myself, that I fixed something else.  A few days ago Kid 2 broke a piece of Kid 1's tea set.  I know you might think it's my own fault for having a breakable tea set, but the admirer of Montessori in me, likes the idea of teaching kids to handle items that are fragile.  Kid 2 is two years old, so he is still learning to be careful, and a piece fell on the floor and broke.  And what did I do?  I put it on my crowded kitchen counter out of reach and pledged to 'fix it later'.  


So today, I took 5 minutes, and just fixed it.


As an aside, I'm a big fan of this craft glue from Martha Stewart.  I've used it for lots of projects, including glueing this particular tea set back together again, and it works really well.


Easy, right?  Now if I could just keep up the momentum and tackle some of the other piles I have in my house (and the mental lists in my head).

This Old House


We recently moved into my husband's Aunt and Uncle's house.  We will house-sit here for almost 2 years while they are on a mission for our church.  The house is amazing, and I am feeling so lucky to live here.  It is just oozing with charm.  Let me show you a bit of it. 


The house was built in 1913 - that makes it 98 years old! 


The fireplace is a Rumford style fireplace.  It is tall and shallow which is meant to give off more heat.


I love all of the wood and neat details throughout the house. 


The house has radiant heat.  There are radiators throughout the house (this one mid-way up the stairs).  I love the detail work even on the radiators.


The bathroom has orginal fixtures.  I love this big bathtub, and the wooden toliet tank is really cool.

Living in this house is very inspiring.  It also has been showing me that when things are made well, and taken care of, they can last a long time.  I think my Grandmother Mary Frances would approve.

Related Posts Plugin for WordPress, Blogger...