Montessori Activities and a Placemat Printable

September 29, 2011

I've started using a Montessori inspired activity book with my four year old daughter.  I checked the book out from the library, and have like it so much that I ordered it online.  Every day I try to do one or two activities from the book with her.  Activities range from life skills, to language, to numeracy.    


One of the life skills presented in the book is table setting.  I was pretty excited to introduce this skill because it is something that my daughter really dislikes doing.  I figured that if I introduced table setting in a positive way, and taught it to her as a skill separate from a job, she would be more likely to want to practice the skill when it came to her suppertime chore.  The Montessori book asked me to make a placemat by tracing a plate, utensils and cup.  I decided to make a digital version, because it looks nicer and is easily duplicated.  And because I liked it so much, I thought I would share it here. 


The Montessori Method of teaching is all about instilling a love of order, and fulfilling the need for children to be independent.  This table setting activity does both.  When I introduced the activity, my daughter worked so hard to place each item perfectly in their correct place.  She has also been loving setting her own spot at the table using the placemat as a guide.


Want to print your own?  Just click on the picture below.


Before making my own placemat, I did a quick Internet search for a suitable table setting template.  I didn't really find anything that I loved, but I did find a super awesome fabric one.  If you are a better sewer than I am, maybe you will attempt it.

Photo via Punkin Patterns


Has anyone used the Montessori or any other method to teach children?  Any successes or suggestions?

Cream Cheese Sugar Cookies

September 27, 2011


A few weeks ago, Emily and I did a guest post over at The Mother Huddle as part of their Story Book Recipe series.  The Mother Huddle is a great blog that we have lots in common with.  The ladies over there are also sewing, crafting, and doing plenty of kid-friendly activities, so please pop over and see what else they are up to.

As you know, both Emily and I love reading good books to our kids, and one way to make story time even more exciting is to bake something related to our favourite books.  Monster Mama by Liz Rosenberg, illustrated by Stephen Gammell is among our very favourite books.  The story is clever and the illustrations are so fun.  I just love the messy illustrations in all of Gammell's work.


When we found out about the Storybook Recipe series, Emily knew that this would be the perfect book to highlight.  We immediately thought of making 'messy' sugar cookies with the kids, since the pictures are full of life, colour, and look a little 'messy' as well.  Sweet sugar cookies with drippy and goopy icing are just the thing for a couple of preschool aged children.


While his cousin enjoyed the story (in Alberta), my son helped with making and mixing the cookie dough (here in New England).


We used my best sugar cookie recipe.  My husband, who usually complains that sugar cookies aren't nearly as sweet as you would think based on how much sugar goes into them, loves this recipe.  I love it too, and it is always the one I make despite the fact that it takes a little extra time to properly chill the dough.  After it had chilled, I rolled it out, and he cut out our shapes.

After our cookies were baked and cool, the fun began!  I had some leftover cream cheese icing in my fridge, so I spooned a little into several small ziplock bags with a couple of drops of food colouring in each bag.  You could mix the icing yourself, but this part is fun for kids and doesn't make a mess (win-win).


My son and his friend had a great time squishing the bags to mix the icing.


Once the icing was all mixed together, they decorated their cookies.  I clipped one corner from each bag and let them squeeze the icing all over their cookies.  The cookies were drippy and goopy looking, a lot like the illustrations, and they tasted just as sweet as the book.  This part was pretty fun! 


Oh, and of course they liked eating them too!  And so did I, since I'm not one to say no to a cream cheese cookie with cream cheese icing.     


Here is the recipe for your cookie making, decorating, and eating enjoyment:

Cream Cheese Sugar Cookies


1 cup white sugar
1 cup butter, softened
1 (8 ounce) package cream cheese, softened
1/2 tsp salt
1 tsp vanilla (or 1/2 almond and 1/2 vanilla)
1 egg yolk
2 1/4 cup all purpose flour
1. Combine everything except for flour in a large mixing bowl.  Beat until smooth.
2. Stir in flour until combined.  At this point, the dough will be very soft.
3. Chill in refrigerator for at least 8 hours.
4. Remove dough from refrigerator and preheat oven to 375 degrees F.
5. Roll out 1/3 of dough at a time to 1/8" thickness onto a floured surface.  The dough will still be soft, so be sure your hands and rolling pin are covered with flour as well.  Cut out shapes with lightly floured cookie cutters. 
6. Bake on cookie sheets (I like to use my silpat) for 7-10 minutes, or until lightly golden brown.
7. Wait until cookies are completely cooled to decorate (I used a simple cream cheese frosting, but any kind would work).

Board Games for Kids

September 22, 2011

This post is a bit of a shout out to my husband.  If there is one thing that he could spend all day (and all night) doing, it is playing board games.  I have to admit that when we first got married, I thought this hobby was a bit dorky, but I will say that board games are growing on me.  Everyone needs a down time activity, and as my husband points out - board games are a lot more social than video or computer games.  Now my husband is into inventing board games (he was a semi-finalist in this year's Canadian Game Design Competition). 


My husband aims to get our kids hooked on board games, and I will say that I don't mind.  Board game playing is a great way for children to learn new skills, and there really are a lot of good games for kids out there.  Some ways that kids can benefit from playing board games are:
  • number, shape, colour, and pattern recognition
  • counting, adding, subtracting and other math skills
  • letter recognition and reading skills
  • hand-eye coordination
  • focus and attention-span building
  • communication skills
  • how to follow rules
  • satisfaction from winning
  • sportsmanship - how to loose at something
I think one of the best things about board games is that kids develop social skills, and they learn a lot by interacting with parents and others who they are playing with.  So play fair, and be a good sport!

Now, not all board games are created equally.  There are some pretty cheesy and low-quality games out there.  Of course, there are some really great games for kids that adults can have fun playing too.  Here are some of my favourites.

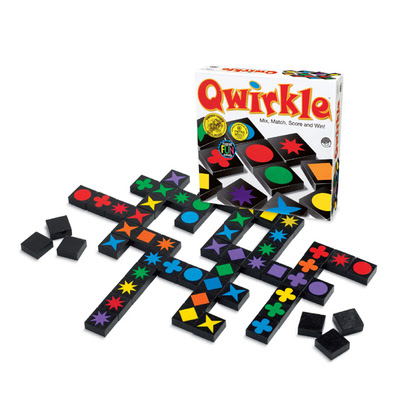
Qwirkle

This game plays similarly to Scrabble, where you play by laying down tiles, adding to the ones that others have played and then picking up tiles at the end of your turn.  Players score points for having tiles of the same colour or shape. This is actually a game for adults, but kids can have fun matching colours and shapes and making patterns out of the tiles.
Image via Mindware

Loopin' Louie
Although haven't actually played this game, it looks so fun I thought I'd give it a mention.  Loopin' Louie has won many awards and is the number one rated children's game in the board game community.  It is a manual dexterity game where you work to protect your tokens from a wildly fly airplane.  You can watch a video of the game in action here.  (The youtube channel I've linked to is a GREAT source for children's board games.  Games with Hayden has over 70 video reviews of games for kids.)

Image via BoardGameGeek

The Orchard
This game is a cooperative board game.  The players work together for a common goal, instead of competing against each other.  The object of the game is to pick all of the fruit from the orchard before the bad crow comes along and eats the fruit.  The game pieces are really lovely - the fruit is solid wood, and the baskets are really cute.  There are a ton of other great cooperative board games out there - it is not something that I knew about before, but I think it is a nice alternative to having winners and losers.
Image via Blueberry Forest

The Ranch - Make Your Own Game
A few months ago, after looking for The Orchard online, and realizing that it is a pretty pricey little game, I thought "I could make my own cooperative board game for children."  With the help of of my husband, we invented a cute little game that uses dollar store farm animals as pieces.  Players work together to fence in all of the animals before they run away.  My four year old LOVES this game and I think that it is pretty fun, too.


Are any of you into board games?  Have you ever made your own?  When my kids get a bit older, I will be encouraging them to follow in their Daddy's footsteps and invent their own board games.  In the meantime, we will be playing a lot of games and doing lots of learning in the process.


Sisters Trip to NYC

September 20, 2011


I'm taking a break from showing you my sewing projects (I promise I have a bunch of refashions to share soon) to get a little more personal.  Last week my sister Emily (of the blog) came to visit me.  Since we graduated from college, we have only been able to get together at most once or twice a year.  Now that we live across the continent from each other again (she's in Alberta, Canada, and I live in New England), I have a feeling our visits will be even less frequent.  But, last week she came to stay for a few days all by herself.  It was so fun to have her visit us (we love her kids and husband too, but it was a real treat to have her all to ourselves), and we packed in quite a few fun adventure.

The highlight of her visit was an overnight trip to NYC.  We took the train into the city on Friday morning and the trip passed quickly as we chatted away.


Our first stop after arriving at Grand Central Station was our hotel, and then we headed over to the UN to walk around outside.  After this, we hopped on a subway down to the Brooklyn Bridge, where we walked past Ground Zero, and admired the statue of liberty from a distance.
 

Our walk back to the bridge took us past City Hall and all the beautiful buildings in the area.  We were feeling energetic and walked all the way across the bridge, and then headed up to the Shake Shack on 77th for a late lunch. This is one of the great places in NYC to grab a quick lunch.  The portebella mushroom burger is awesome!

Our next stop was the Metropolitan Museum of Art via a stroll across Central Park.  If you are going to NYC, be sure to visit the Met.  Even if you only have an hour to spend, it's so fabulous, and since you pay what you want, you don't feel like you need to stay all day to justify the entrance fee.  And if nothing else, the view from the roof is worth the trip.


Since we were in the mood for museums, we walked over to the MOMA next.  On Friday nights, Target sponsors a free event from 4-8 pm, so that made it a great time for us to visit.  It's been a while since I've spent this much time at museums, and it reminded me of the days when Emily and I were in Vienna together for a semester of college and we went to LOTS of museums all over Austria, and Northern Italy.

After a yummy and affordable dinner (we both ate for $18 total including tip) at Pam Real Thai in Hell's Kitchen, we headed back to our hotel (we used Priceline to get a great deal by booking on Thursday).  After a full day of walking all over Manhattan, I was one tired pregnant lady!  But luckily the next morning I was ready to do it all again.

On Saturday morning we took the Subway down to Canal street and walked up Greene street in SoHo.  While walking up this sleepy street (everything was closed when we walked by just before 10am) we stumbled across this bike.  I can't imagine how much time this took someone to crochet.  It was such an unexpected find that I had to take a picture!


Our wanderings took us through Greenwich Village, and then east towards Union Square.  Here we stopped for lunch at Num Pang Sandwich.  This is another place that I would highly recommend.  We've both been to NYC a few times and have seen all the big sites, so this Saturday was all about checking out cool looking neighbourhoods, eating yummy and inexpensive food, and spending time together.  Oh, and of course we had to spend a little time in the garment district as well.  

Just like last time I visited, I had a hard time finding Mood Fabrics, but we were glad we made it.  For all you Project Runway fans out there, this is a must see in NYC.  It's huge, but actually feels a lot smaller and more cramped than it looks on TV.  But they really do have everything there.  There are walls full of ribbons all arranged by colour and width.


And did I mention ribbons?


All the leather that you could ever need in every shade, weight, and type.
 

Unfortunately, soon after our wanderings through the garment district, Emily had to catch the train to Newark to fly back home.  I wish she lived closer so that we could do these kid-free sister visits more often.  Especially if they take us to NYC!  Even though it was a fast visit, and we spent just barely more than a day in the city, it was the perfect way to end a very lovely visit. 

I've been thinking that we should have more regular sister visits (maybe we will be able to get together with our other sisters and sister-in-laws next time).  What do you do with your sisters when you get together?  And what do you like to see in NYC?  I'm always looking for someplace fabulous (and cheap) to eat when we are in for the day.  Any recommendations?


Manly Smart Phone Case

September 15, 2011

My husband recently got a smart phone.  It's a pretty fun toy.  To keep it protected in his pocket, bag, or backpack, I made him a simple case for his smart phone that looks decidedly manly.  It is a project that you can whip up easily with a few small scraps of fabric. 


 Here's what you need:


2 small pices of fabric (manly looking fabric if it is for the man in your life)

smart phone as a template

thread


Here's what you do:


1. Measure your phone.  


You'll need the fabric to be 2 times the length of the phone plus  1.5 inches.  The width should be the width of the phone plus 1.5 inches.


2. Cut your fabric.


You'll need two pieces, one for the outside and one for the lining.  My pieces measured 7.5" by 4.5". 


3. Sew the lining. 


My lining came from fabric scraps, so I had to sew two pieces together to make it long enough.  So, either fold your fabric strip in half, or if you're like me, make it long enough.  Then, sew up the sides so your phone fits inside.


4. Sew the outside.


Fold your fabric in half, right sides together.  Sew up each side, making the case 1/8 inch bigger than your lining piece.


5. Sew the pieces together.  


Turn your lining piece inside out and slide it into your case fabric.  Tuck the fabric into itself, so no raw edges are sewing.  Sew around the top edge, and you are done!  (Oh yeah, and don't forget to trim your thread like I forgot to do in the picture below.)


Ta-da!  You now have one smart looking phone case.


Lincoln Log Toy Bag

September 13, 2011


I live in a small apartment, and my living room is also my dining room, and front entrance, and family room, and play room.  And the entire space is about 200 square feet.  We are a little crowded, but we make it work.  My kids have a few toys in their room, some in the unfinished basement, and the play kitchen and playdough stuff lives in our kitchen.  Most of the toys are stored in our living room in the bottom of a big oak book case.

After my son's birthday, it was time to sort the toys and put some away that aren't being played with. When I was finished shuffling things around and adding more birthday lego to our collection, there was no longer room for the Lincoln Log box to fit upright in the bookcase.  As you can imagine, this has not been ideal for keeping the toys inside the box.  And really, since they belonged to my husband when he was a boy, the box was looking a little worse for wear.  It was past time to find the Lincoln Logs a new home.  I like to store toys in fabric bags to keep everything together, and then they can be easily stored in bigger plastic bins, or can also be put on the shelf as is.


A few years ago, I found this image of a fabric little people bag at Elsie Marley.  I love the idea having all white toy bags with appliqued pictures of the bag's contents on the front.  I know I'm crazy to use white with kids.  I actually use white in a lot of the textiles in our home, partly because we live in such a small space, and white helps things feel lighter and larger, but also because I love the way it looks.

In the past I have made bags in this style for blocks, and trains, and I decided to keep going with my theme and put together a bag for all those Lincoln Logs.  Doing the applique is easy, although a little tedious.  I use Wonder Under (bought at Joanns) to adhere my shapes, and then do a satin stitch all the way around each piece just to keep everything secure.  This is likely overkill, but I know that this bag will get dirty and need to spend sometime in the washing machine, so I'd rather just make things extra sturdy to begin with. 

There is nothing special about this bag, but sometimes it's nice to do some sewing that is useful and at least a little cute.  And easy.  It started out as two rectangles of some white cotton duck (measuring 15" by 20"), and is basically just sewn up the sides.  Nothing fancy.


The openings for the ties are in the side seam, and reinforced on either side.  The ties are made of 1" wide strips of knit fabric that I had in my stash. 


I also boxed the bottom corners to create a bit more space inside the bag.  This is such an easy thing to do.  Just line up your corners so that the side seams are on top of each other and in the center, and sew a perpendicular line through the seam.  I sewed mine 2" from the corners.
After boxing the corners, I tacked them down to keep things tidy on the inside (just like on a paper bag).  Here is the view from the inside:


And here we have how it looks from the outside as well:


It's just the right size to store a full set of Lincoln Logs, and everything stays nicely inside once the top is closed.  It's a good feeling to restore a little bit of order to our space!


What do you do to keep your toys organized?   What do you do to keep shared spaces organized?  How do you keep kid's toys from taking over your home (and your life)?  And am I crazy for using white?


Thrift Store Scores

September 12, 2011

A few weeks ago I had some major success at my local Salvation Army on 50% off Wednesday.  I just have to share what I picked up for just a few dollars.

Several boring, but useful items...


... cute vintage clothes for the girl on the way (the dress is a pink seer sucker and is so darling)...


... and two sets of Vera dinner napkins.


I was particularly thrilled to stumble upon the napkins.  A worker had just brought out a new bin of linens, and this stack of napkins was sitting on top, all still neatly folded.  Even from a few feet away I knew they would be high quality cotton, and I had a sneaking suspicion that they were made by Vera.   When I brought them up to the counter I had no idea what the cashier would charge for both sets, but she gave me the stack for $1.  Yes!  They are beautiful, vintage, and useful.  I love using cloth napkins, and these fit in with my collection quite nicely.  I considered trying to sell them on Etsy or Ebay, but I decided instead to keep them for myself and enjoy my thrifty find (although $30 would have also been enjoyable). 

I also recently picked up a couple of dresses that need a quick refashion and should be appearing on this blog soon, and two free strollers!  I was at the Goodwill when a worker was wheeling two strollers towards the dumpster.  Apparently it's against their policy to resell strollers (so keep that in mind if you are thinking of donating strollers to them), and they were headed for the trash.  Of course I couldn't let them throw away a perfectly good McLaren umbrella stroller and a Peg Perego Pliko Lite.  So I folded them both up, and drove away with the huge rush I always get when I score at the thrift store!

What kinds of bargains have you been finding lately?  Please share!

Apple Prints

September 8, 2011

I don't know how it goes it your house, but at my house my kids do not play by themselves.  (Well, the baby crawls around ripping everything out of cupboards and off shelves, but the four year old just does not have the "entertain herself" skill.)  So, I feel like I need to have a lot of tricks up my sleeve to get through the day.  One of our favourite projects recently is printing.  In September apples are abundant, which makes this kid craft perfect for fall.


To make your own apple print, simply cut an apple in half, dip it in some paint, and stamp away.  I've seen this done with other fruits or vegetables, too. Don't you think corn on the cob would look neat?  I'm not going to lie, most of my daughter's paintings end up looking like the blue mash of paint you see in the picture below.  (And, yes mine is the neater print you see in the bottom of the picture.)  However, I always remind myself that kid art is about the process, not the product


With older kids, you could get into patterning, or use permanent paint and print onto fabric.  Has anyone else tried printing with fruits or vegetables?  Later this week I think we'll try leaf printing for another fall themed art project.


Related Posts Plugin for WordPress, Blogger...